I love to do crafts and have cute handouts and activities for church (and school, and friends, and - well you get the idea). I don't consider myself creative, but often use the help of others' talents. I decided to share what I'm doing for others just like me. It may be a link to where I found something or it might even be something *I* created. Right now I work as a paraprofessional at my kids' elementary - in special ed (autism). I started creating items for my 3rd graders this year and can't wait to share them with you. I am the 1st counselor in YW (first time in YW is this past year). I also have ideas for cub scouts and sunbeams posted, my previous callings.
Showing posts with label School. Show all posts

Sunday, March 3, 2013

PI 3.14 Day, DIY Pie on a Stick

Pi day is March 14.  Why? Because pi = 3.14 and PIE backwards is 314.


My daughter's middle school has Pie day on 3/14 (March 14) and the parents make pies for the school to sell by the slice as a fundraiser.  So instead of making a traditional pie we made pie on a stick.  I also wanted to give a little treat to the teachers.

First roll out your crust.  I used Pillsbury frozen crusts and rolled them out.  Take a round cookie cutter or biscuit cutter and cut the dough - you will need 2 of each circle.  Place the circles on a cookie sheet leaving room for sticks.


Place the sticks on the circles.  I used the large sticks.


We used apple pie filling from a can.  Scoop it out - not too much, about two apples.  Place another circle on top and seal it closed.  We used the end of one of the sticks to push it together.


Spread some egg white on top and sprinkle on some cinnamon sugar.


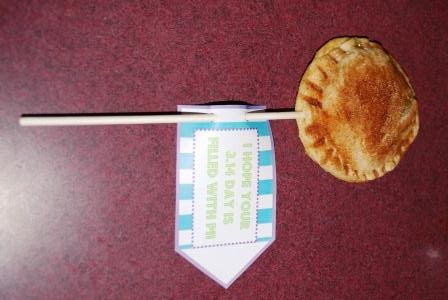
Cook it according to the directions on the package of the crust.  Keep an eye on it.  Print out the tags, cut out, punch, and slide onto the stick.


Here is a closer look of the tag:


If you choose to download, please become a follower first (on the right).  I'm happy to share my creations with my followers.  If you would like to leave a comment too that would totally make my day!  

Download the tag here.

See my Link Party page to view Parties I've linked to.


Friday, March 9, 2012

A Birthday Cake for a Teacher {Supply Cake}

One of the first things I saw when I joined Pinterest was this supply cake. I KNEW that is what I needed to make for the birthday's of my kids' teachers this year. As you can tell from this blog I'm a big advocate of giving teachers a little something. Unless you are in the schools (volunteering/substitute teaching, etc) you have no idea how much these teachers do!
Since I work at the elementary school, every month I look at the whiteboard calendar to see if it contains any birthday's I need to know about.  So the beginning of March I look at the calendar and see that Boo's Teacher's birthday is the NEXT day!  I still want to do make her a supply cake, but I have no time to go to the store.  So I do the next best thing.  I go through my stash of school/office supplies to create this:
If I had more time/supplies I would've liked to do a few different things to it, but considering I didn't purchase anything I think it turned out nicely.
I didn't take step by step instructions, but here is what I did.  First I took a roll of paper towels as the center to hold everything.  If I had it on hand I would have used a large (Coscto size) container of Lysol wipes.  Teachers definitely could use those more than paper towels.  Anyway, take a roll of paper towels (or container of wipes) and wrap around some spiral notebooks (or folders with or without brads - or even composition notebooks, but these are short for paper towel center) and stick a large file elastic around the entire thing to hold it together.  It will probably require extra hands because those notebooks don't like to stay curled around.  Don't worry too much about how spread out they are, you can move them around after the elastic is on.
I almost forgot.  You will need a base.  It ends up being pretty heavy so make sure it is sturdy.  You could you cardboard or a cake base, but I stuck with the supply theme and used a clipboard (I just set the cake on it, I didn't adhere it):
 

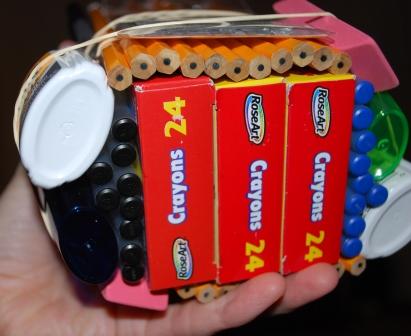
Now it is time to put supplies onto the cake.  I really like the boxes of crayons along the bottom to make the bottom layer wider, but I didn't have enough.  So going through my supplies I came up with this:

The bottom layer of the cake is glue.  It rotates between liquid glue and glue sticks.  As you can see I had two different kinds of school glue on here.  I wanted a middle layer, but it couldn't be too thick and so I came up with post-its.  One can never have too many post-its! Put as many on as you can and put another elastic around it.  You can add more after the elastic is on.
For the top I put a smaller elastic around three boxes of crayons.  Then put mores supplies around them.  First I added pencils to two sides opposite each other.  To the other two sides there are pens (They lay flat against the crayons when my hand isn't moving them).
I thought it was a little plain so we added more supplies around the pens and pencils. On one side are some stamps:
On the opposite side are some dry erase markers:
The other two sides have a pencil sharpener, an eraser, and a bottle of white-out.  On top/in the center is a container of clips:
After all your supplies are attached via elastic (and if you have pieces such as the crayon topper attach with adhesive - I used a tape runner). It is time to add ribbon to cover up all those elastics you see:
I went through the ribbon stash and found some cupcake ribbon and alphabet ribbon.  I found some coordinating 1 1/2 inch ribbon.  I didn't have much left of the pink & yellow cupcakes, but there was a few elastics to cover up (since I added so many layers).  I used the yellow ribbon over the elastics and had just enough cupcake ribbon to put around one of the ribbons:
The middle layer has the alphabet ribbon:
and then another layer of birthday ribbon:

Here is the full cake with the ribbon:
I decided it need a little something else to spruce it up and hide the seams in the ribbon.  I went through the flower stash to see what I had in coordinating colors.  I came up with this:
I think Boo's teacher was impressed with her cake.  Hopefully she will enjoy it and won't have to purchase many supplies out of her own pocket.  Happy Birthday Ms. Millson!

Linking to:


Monday, August 1, 2011

I Need Help Coming up with Sayings. . .

I need the creative minds of you, my readers and friends.  I need to come up with some sayings and since I'm not as creative as many of you I thought I would beg for your help.  In return I promise to share what I make for all to use.  Read on and I'll explain.

I thought of this idea last year, but then was hired on at the school about 3 days before school started and since I hadn't worked for 5 years the time was spent adjusting instead of implementing.  At our school the classrooms don't have recess equipment unless the teacher has collected it her/himself (although thanks to fundraising the PE teachers do have some items now to check out for recess).  I was thinking that it would be nice to give the classroom a monthly gift by way of a item for recess.  At the beginning of the school year I would give a bag with a saying - something about: Here is a bag to collect all of the fun we will have this year.  (See what I mean about needing your help!)  Then each month I would give a piece of equipment to go in the bag along with a saying.


Here is an example.  I bought some bubbles for one of the months and this is what I have come up with:


This one has three sayings, but I don't necessarily need that.  The biggest bonus is that I was at Target this last week and their summer stuff is on clearance.  I was able to score bubbles, a football, sidewalk chalk, a jump rope, and a baseball bat & ball all 75% off.  I'm excited to do this idea this year at such a reasonable cost!  So if you would like to do this idea with me go stock up on all the clearance sales now.  I promise to post what I make ~ especially if you help me out (You can find the tags under Monthly School Idea).  Of course you don't need to follow me and do one a month, but it would be a cute teacher gift during teacher appreciation or any other time during the year.

Some equipment I need sayings for:
football
baseball bat & ball
bubbles (this one I have some ideas for -see above- but if you want to add to it feel free)
sidewalk chalk
jump rope
hula hoop
basketball
kickball or four square ball
soccer ball
Hoppy Taw (hopscotch)
Feel free to add to the list of equipment since I have purchased everything yet.


Just leave me a comment with your idea.  If for some reason that won't work (I had some issues, but I think it is fixed now) you can email me at flowersandbows(at)gmail(dot)com.

Thursday, July 14, 2011

Summer Gift


For the end of school I copied an idea off of an old friend's blog: True Blue Aggie Fans (you have to scroll down a bit to see hers).  I, of course, made them for the Kindergarten class I'm in and for my two kids who are in elementary.  
I learned a few things: 
1 - I didn't bold my print, but I fixed that on the printable for you. 
2 - I haven't decided if I would do this again (at least for school).  There is a lot of risk of them popping all over everything.  (I didn't think about it too much until I saw the reaction of the teacher when I showed her what I brought).  I had them put them in their backpack, but then wondered if I should have had them carry it.  If I do it again I'll send it in a few days before school gets out that way the teacher can decide which day is best (when they are bringing home the least amount of items).  My Kindergarten class brought almost everything home that last day, but my 4th grader had brought most of his stuff home before the last day. 
3 - All white print looks better. 
4 - The tags were smaller than I thought ~ The printable is a word document so you can make it larger if you chose to.  
5 - It is much cuter to cut out each Popsicle, but takes a lot less time to cut a square around it. 
6 - The teachers are busy and may not remember to send them home (oops my son & teacher forgot).  
7 - They are still so dang cute!
Take the advice as you will.  These would make great gifts for other activities too ~ maybe ones that don't involve bringing home a years worth of school work & school supplies.


Don't forget when downloading:
Click on the blue download button:
You then need to wait 20 seconds and then click on the link that appears over the countdown (blue underlined words: Download your file now).

Tuesday, April 19, 2011

An Eggstra Special Lunch

Today an idea hit me.  I'm totally excited that this is my OWN idea!  Yay!  I guess every once in awhile I do have a creative thought.  This idea was when I was contemplating what fun things I should do for my kids' lunch the Friday before Easter (I usually cut their sandwiches into holiday shapes, etc).  To accomplish this I bought a bag of 42 regular sized Easter eggs and 6 jumbo eggs (I bought some Jumbo eggs for another project so I had extra just in case - after starting to assemble I think I'll need 3 jumbo for each child) and I'm going to fill them with my kids' lunch for Friday at school.
First, I'm putting cheese puffs in some eggs.  I can fit 4 cheese balls in each egg.  I filled 3 of these eggs for each child.


Then I'm putting rabbit food in the some eggs - Veggies.  I could fit only two baby carrots in an egg or two carrots with 1-2 snap peas.  For just snap peas I could fit 4.  (I have one child that likes them both, one child that will only eat the carrots, and one that will only eat the peas).  For carrot involved ones there were 3 eggs for just peas I did 2.


Next I'm putting in grapes for their fruit.  About 3-4 grapes fit in an egg.  I'm giving them 3 eggs of grapes.


I also bought a few jumbo size eggs.  I put in two cookies for dessert in one.  In two others I'll cut their sandwiches up into bite size pieces.  I'm also going to have them buy milk so that their drink won't smash open the eggs.  I could have put each ingredient in jumbo eggs and then I would be able to put more in, but I want a lunch box full of Easter eggs with each egg being a mystery.


Lets see I have fruit, veggies, sandwich, chips, and a dessert.  I will probably cut a string cheese up into chunks as well (at least for my son).  I'll see how many eggs this really is and if there is room for more.  I may add another grape egg or two.

So if I stick with the egg count there will be three jumbo eggs, and nine regular eggs.  I think I will add a few more grapes to the menu.

Don't spoil the surprise!  I'm hoping I can get their lunch put together and ready for them so they won't know what it is until they open it at lunch. 

******UPDATE******
You'll need more eggs for the sandwich.  To get it to fit nicely plan on three jumbo eggs (brings the total to 4 jumbo eggs and 10 regular eggs (I added one more grapes).  I cut into 9 squares and put three in an egg:


Here are the pictures of their lunch boxes as promised:


The kids LOVED them and so did their friends.  I even received a "Your mom is SO Cool" comment from a 4th grader.  A+ in my book.  I think my middle school child even liked it. 

For a free printable to put in their lunch box click here


Linked up with:
I Heart Nap Time


KitchenFun
”Pin

The picture above is for: Cheap Crafty Mama

Wednesday, March 30, 2011

Wacky Wednesday

It was Wacky Wednesday for Spirit Week at Sis' middle school.  It is really the only one I helped her with very much.  Next year she is telling me in advance and we are making plans for every single day!  Here she is:


I started her hair similar to Boo's for Dr. Seuss Day.  The idea to do this (or at least the top one) came to me last year, but she wouldn't let me do it then.  This year she was all excited to be wacky.  My girls have thin, fine hair.  Sis has more than Boo, but still doesn't have a lot.  My secret: cones.  Since she doesn't have much hair I just rolled card-stock into the shape of a cone and stapled it together.  If your daughter has lots of hair try using a Styrofoam cone (but be warned Styrofoam costs more than it looks like it should).


Make a part (I did mine zig-zag to add more wackiness) around in a circle on the top of her head.  Insert cone in the middle and pull the hair up around it covering the cone.  Put in an elastic at the top.  I tried to put it on the tip of the cone, but it just slid off.  At the top it doesn't matter so much, just get it as even and tightly secured as possible.


Part the rest of the hair in half.  These cones are a little harder to put it.  It is nice on the top cone that it can just sit on her head.  On the two side cones I actually put in two elastics.  One first at the end of the cone and a second over the cone and hair (near the end).  Tie with some not matching ribbon.

Yes, I did use hair products.  If I had more time (i.e. a little notice about spirit week) I would have tried to pick up some color spiking gel that we used in my son's hair for Dr. Seuss day.  That stuff has some serious hold to it.  I've only used it the once, but I may have to get more and investigate the possibilities.  But, alas no hair color to be had (or purchased) so I used what we had at home: Garnier Fructis Style fiber gum putty and hairspray.  It worked and was still standing strong when she came home from school!