I love to do crafts and have cute handouts and activities for church (and school, and friends, and - well you get the idea). I don't consider myself creative, but often use the help of others' talents. I decided to share what I'm doing for others just like me. It may be a link to where I found something or it might even be something *I* created. Right now I work as a paraprofessional at my kids' elementary - in special ed (autism). I started creating items for my 3rd graders this year and can't wait to share them with you. I am the 1st counselor in YW (first time in YW is this past year). I also have ideas for cub scouts and sunbeams posted, my previous callings.
Showing posts with label Holidays. Show all posts

Wednesday, March 13, 2013

3.14 = Pi = Pie


This is our second year of making pie on Pi day or March 14 (3.14).  To see last year's project and how to make pie on a stick click here.  This year the middle school didn't do their pie fundraiser (bummer), but we still wanted to give the teachers a little bit of pie.  We made pie on a stick again except this time I used a kit I bought at Target on the Christmas clearance.  ~I'll most more about it later~ These pies are smaller than using a cookie/biscuit cutter.  You can do them any size you want and and shape you want.  Just a little advice don't make them too big, last years pies were a bit heavy and some of the pies fell off the stick.
Since the pies were smaller I wanted to make smaller tags.  Here is what I came up with:


If you choose to download, please become a follower first (on the right).  I'm happy to share my creations with my followers.  If you would like to leave a comment too that would totally make my day! 

Download the PI Tag Here 

Thanks for stopping by.  To see who I link with check out the page tab above.

Monday, February 11, 2013

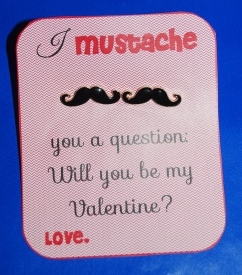
Mustache Valentines

Mustaches are all the rage.  This is actually the third year my daughter(s) has been into mustaches.  Our first mustache project I shared was for Valentine's Day 2011, last year she went with chocolate covered marshmallows and this year we are back to mustaches.  We had all sorts of fun with her birthday party last summer too.
I created a bunch of mustache themed Valentines.  Some we will use and some are just for you!  Two sets were inspired from some great Amazon deals: adhesive mustaches (you can find these anywhere, even at the dollar store) and mustache earrings.  My original plan was for Boo to give the girls in her class mustache earrings and the boys adhesive mustaches, but much to my dismay I learned that there are a lot of 8-9 year old girls who don't have their ears pierced yet.  So her class will receive the adhesive mustaches and the teen will give the earrings to her friends.
Here is what I came up with for the adhesive mustaches:

I intended the first mustache saying to be used with the mustache earrings, but work well with the adhesive mustaches.  The saying just is used a lot, but that is all I could come up with for mustache earrings.  They were less than $1 each on Amazon with free shipping.  They take a long time to get here so if you want to do this order them for next year. 

You can also use the "stick" one with a stick or package of gum. Or even a package of paperclips or staples for your teacher.


I also made one that you can just print (no earring, gum, adhesive mustaches required).  These are designed to go on the jumbo craft sticks.  These sticks can be found in any craft store.  I bought a large box at Wal-mart.


For some reason I couldn't get the chevron background to print correctly on most of them (and of course I didn't find this out until working on them for hours).  They will print from Microsoft word, but not from a PDF file.  Unfortunately if you don't have the same fonts on your computer they won't look right if you try to print for word.  I tried changing up the background for you, but I still had problems.  So I decided to take out the background and print it on colored patterned paper (it is actually cheaper this way because it saves a lot of ink).  I picked up a package of 12 sheets of paper in the Valentine dollar section at Target:


Here are all your downloads and as always: If you choose to download, please become a follower first (on the right).  I'm happy to share my creations with my followers.  If you would like to leave a comment too that would totally make my day!
 

If you have and questions, problems, or comments, leave me a message!
Here are a couple more downloads for the craft sticks:
I'm out of magenta ink so I haven't printed all of these.  If there is a problem, let me know.  If I was selling them I would triple check everything, but since they are freebies I'm relying on you for feedback.

Scroll down for last year's Valentines.  That post also has a link to the Valentines made the year before!


I linked with

Thursday, March 15, 2012

Sneak peak at the St Patricks Day Treat

Here is a sneak peak at what we will be giving for St Patrick's Day. And it was NOT pinterest inspired!

Tutorial to follow, but all you need are Glad containers, green spray paint, black ribbon, yellow or gold paper, and something fun to put inside.

Friday, February 17, 2012

A Seussy Kind of Day

Since it is almost Dr. Suess' birthday and Read Across America day (March 2nd) I thought I should post what we did last year.
I had so many things to post (or so I thought, but a year later I don't remember).  I will post pictures of some of the things we did.
At school we dress as a Dr. Seuss character.  We aren't very original and use some common characters.  This year I might have to read a few more books, but for some reason Dr. Seuss is one that we don't have a lot of.
Boo was Cindy Lou Who:


My poor daughter (and myself) hardly has any hair so this hairstyle isn't the easiest, but with too much hair it may be hard too.  I rolled a piece of paper into a cone shape then lifted top section of her hair over it and put an elastic at the top (put it over the top of the cone too - it gives it a little more stability).  Leave enough hair at the top.  You are going to need to put in another elastic just a little way up and then curl it out in pieces.  The bottom half of the hair you split into two and braid it.  I also took some hair putty to separate out the bottom of the braid & curl up the pieces.
Bugs was thing two:


I just printed out a round sign saying Thing 2.  He wore all red and we used a colored spiking gel to dye his hair blue.

At home this was part of our dinner (not sure why it looks so yellow - doesn't look very appetizing, but it was!):


Green Eggs: just make some deviled eggs using your favorite recipe.  Mix some blue food coloring to the yolk and  you have green centers.
I also found these blue skies with white clouds.  I can't remember what book it is from nor were I found it (if you know leave me a comment):


To make these follow the instructions here (I loved them so much I used them for St. Patrick's day too.  I was able to use the left-over whipping cream). 
And for desert:


Yep, more green eggs.  A scoop of Lime Sherbet with whipping cream sprayed around it.


That sums up last year.  Guess I should figure out this year before it sneaks up like last time.


Wednesday, March 23, 2011

A Day Full of Green and Rainbows - Part 1 (getting ready)

Another Holiday and another day for me to have fun!  My husband thinks that I like the holidays more than the kids.  Maybe he is right, but I get the most joy out of seeing the kids so excited.  I also decided that he probably wishes I put as much effort into cleaning the house as I do in destroying it with all my projects :).
The holiday began on Wednesday.  I decided to make rainbow cupcakes found on familyfun.com.  I think they are SO cute, but they are a little bit of work.  Plus they only make 16 versus the 24 so if you want to make them for school or something similar you may have to make 2 batches.  Although if you don't eat a ton of cake it cuts down on the amount cupcakes you have on hand.  I made them for the kids' lunches plus took them to my scouts.
Here is how I made them:

Make a white cake mix according to package instructions.  Divide into six small bowls:


 By small I don't mean very big.  To give you an idea I used 2 cup containers and it only filled it this much:


Dye each bowl a color of the rainbow.  They have the formula on the link above, but just in case you are lazy like myself and would rather have it all in one place I'll give you what I followed:
Red: 18 drops
Orange: 4 drops red, 12 drops yellow
Yellow: 12 drops
Blue: 12 drops
Green: 12 drops
Purple: 9 drops red, 6 drops blue

FYI - Make sure your food coloring isn't almost gone.  I also didn't compare the bowls to make sure the batter was even (though it was close) so I used the one that I thought had the most as red since that was the top color.


 I used those teaspoons pictured above to put one scoop into the paper cups.  I then used the back of the spoon to spread out the batter.  The purple is spread out and the bottom left corner shows the blue one spread on top of the purple. 


I found that if I used a swirling motion (twisting of the spoon from the middle to the edge) I was able to spread the batter easier and smoother.  Also I noticed that I tended to make scoops bigger when I first started than when I ended so  I varied my starting place.  You won't get more than the 16 cupcakes so make sure you go ahead and use all the batter.  Color order: purple, blue, green, yellow, orange, red.  Then the top color of the rainbow - red is the top color of the cupcake.


Here is what it looks like finished (I didn't take a picture of it cut in half, but I think I may have one left ~ If I do I will do just that). 


Here is a top view:


I just added some white cloud frosting and some 'gold' found at the end of the rainbow:  Not the prettiest topping, but I was out of time before scouts started ~ they only cared about the treats anyway.  They did like the rainbow however!


Speaking of scouts (which is where I left off before the cupcake pictures) I also made them these cute little handouts found here.  


We also took a break from the bear book and decided do something fun.  I gathered up some boxes and other containers (can, egg carton, etc), some craft sticks, string, glitter, green and gold paper, and Rolos.  Brought some glue, tape and scissors then asked the boys to make some leprechaun traps.  I even hauled my camera there with all that stuff, but completely forgot to take pictures.  They did pretty good especially since I had my 7 year old with me and I was helping her make one most of the time.  Here is what they came up with (when they had them laid out around the house):


 Boo's Trap: Used a Capri Sun box.  She covered it green paper and put some glitter gold inside.  She decorated the outside with a 4 leaf clover and a rainbow.  She put a Do Not Enter sign on the outside because we all know Leprechauns don't follow the rules.  We took the plastic container the cupcake liners came in and punched a hole in it.  We tied a Rolo to the end and strung the string through the container and up through the box.  The string was taped lightly to the top of the box holding the container up.  When the leprechaun pulled on the gold Rolo he would release the plastic cup trapping him inside.  She didn't catch him, but she did catch a few green coins and he left his footprints there!  She was so excited the next morning.


Bug's creation.  He wasn't too thrilled how it turned out, but he created it himself and used his imagination.  The Rolo was in one of the holes and the leprechaun was supposed to stomp on the paper and fall through getting caught.  As you can see the leprechaun left some foot prints and green coins, but didn't get trapped!

Like I mentioned before all of our activities are at the same time so I brought a treat for those that I visit teach that I knew would be there.  I fully intended on delivering the other two the following day, but I didn't have the time to do it and get my dinner made. 


The saying reads: You are better than any Treasure found at the end of a Rainbow!  It is attached to the rainbow candy: skittles and a treasure candy.  I fully intended to take a picture of the bag the candy came in, but got caught up in getting projects done I forgot.  It is a purple metallic bag.  The pieces are individually wrapped and say Treasure across them.  I wasn't even sure they existed, but went looking specifically for treasure candy and was so excited to actually find some!


I also stayed up way too late making gifts for teachers.  After starting to substitute last year I began to comprehend how much time and effort our teachers put into our child's life.  Face it they are with them for 6 1/2 hours + a day.  That is a lot of time in our child's life.  I decided that I would try to show my appreciation for them a little more often even if it is in small ways.  I had bigger plans this year, but working full time for the first time in years I wasn't able to pull it off.  I have an idea though so maybe I'll try it out next year!  Anyway back on the subject, I scoured blogs and found some fun candies and viewed other people's creative genius at work.  A few ideas popped into my head and this is what I came up with:

These were for their teachers and Boo's paraprofessional.  It had Twizzler's rainbow licorice in a bag with gold candy (Rolos) and Treasure Candy.  When assembling your rainbows remember Roy G. Biv


I made these bags too:


Our schools are lucky enough to have specialists: 2 PE teachers, a music teacher, and art teacher, a computer teacher, and a Librarian (fingers are crossed that we don't lose ANY of these guys with all the budget cuts).  So I made them these (after subbing for them last year I realized how much work these teachers do as well and how little thanks they get AND they have the WHOLE school to teach!):

The tags were modified to say Librarian, Art Teacher, etc.  I filled one of the 4x6 bags with some fun treats just like the other teacher's present: Twizzler rainbow (there is enough in one bag of Twizzlers to do five rainbows and YES, they have the SAME amount of each color ~ that was a great help!), Rolos and a treasure candy.  I had to trim the licorice to fit into the bag.

Then I was thinking that I keep ignoring the middle school teachers.  After all there are 7 (okay 9 since all three PE teachers work together) and I keep thinking that is SO many.  Then I realize that I just made 9 gifts for elementary teachers.  Hmmm, what could I do?  I took what was left of the candy and assembled some more bags:


They had the cut up licorice in it and the candy.  It wasn't quite as cute, but at least they weren't forgotten.  Actually some of them were (PE teachers) since I only had 6.  My new goal is to continue to find cute inexpensive gifts like these for the specialists AND middle school teachers.  I added specialists to the list last year (all my kids were in elementary last year) and now I need to incorporate the new set of teachers.  I'm not sure what I'll do in two years when they all have 7 + teachers!
I had someone say that they didn't download correctly for them.  If that is the case for you, please leave me a message.  I tried on two different computers and they worked for me.  Just in case I uploaded them to a different site.  To try that site click HERE for the same printables as shown above.

Link up to:


Sunday, March 6, 2011

Valentine's Day

I Love, Love, Love holidays.  It gives me an excuse to do a little extra and have a little fun.  Although if you ask almost anybody around me (especially my husband) and he'll tell you I go overboard.  I absolutely LOVE all the blogs out there with all the creative people that share their ideas.  I am one that loves to make things, but I'm not usually the one that originates the ideas.  In truth that is why started this blog is to share what I do (and where I got the idea from).  The only problem I see with this is that my friends will learn my secrets and all the teachers will be getting the same gifts :)  I won't look as creative then will I?


Holiday meals tend to be the color of the holiday.  We always have pink pancakes for Valentines Day.  Now I know that people often make them in heart shape, but if the truth be told I tried that once and they didn't look much like hearts.  Maybe I better practice before next year.  This year I did add to our pancake breakfast and made some heart shaped sausage patties.  I just purchased the sausage you slice into patties, sliced them up, molded them into hearts, and then fried them.  The kids loved this new addition.

I had all the links up where I received my inspiration for the items I made below, but my browser crashed and I lost the sites.  I'll try to find them all (because most weren't my ideas) to give credit where credit is due!


Boo's Valentine Idea I actually found last year here.  We already had our valentines then, but I LOVED it so much I knew I would do it the next year.  Then I found something else I LOVED and decided to combine the two.
I started with the picture complete with the design from the second site listed (the first time I used photo shop - I really want to figure out how to use it now) and stuck in some suckers.  I had these heart suckers already so I used them (this picture is smaller so a smaller sucker works better):


Then I added the card-stock and Fun Dip:
I had Boo write who it was to/from on that little flap holding in the fun dip.
 
 The completed class set:

 I made my boys in my Special Ed class at school bubble Valentines:


And for the Kindergarten class that two of my (meaning special ed) boys are in and the majority of the time I was in I made these:
The shovel idea I had from FamilyFun.com years ago (I don't even think sis was in school yet) and I always wanted to do it, but wasn't willing to spend that much on shovels in January/February. At the end of summer last year I found a bunch of shovel sets at the dollar store on clearance.  Yay!  I finally could make them.  I didn't want to fill them with candy because there is so much given already, but I ended up throwing in a fruit roll up.


Sis in middle school is obsessed with mustaches right now.  When I saw these I knew she would LOVE them.  She did.  She even traced and cut out enough for her friends, her homeroom class, and her brother's class: (This is the only link I need to find)


Sis took these to her teachers at middle school (I bought them the year before as a two pack in the Target dollar section):


Bugs and Boo gave their teachers/paraprofessionals these:


After school there was pink hot chocolate:


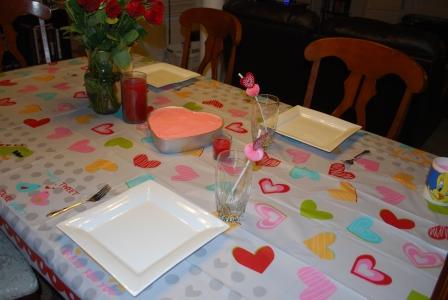
The table was decorated with a Valentine's Day table cloth, my roses my husband gave me, red candles, white plates, a pink heart cake (the other half of the cake mix was made into heart cupcakes for the lunch boxes ~ oh and speaking of lunch boxes they also had strawberry jam sandwiches the shape of hearts, strawberries, Doritos [as close to red chips as I had], and pink gogurts), and some fun straws:


Then for dessert we didn't even have the cake.  Instead I took some Pillsbury Cinnamon twist and tried to twist them into hearts:


After they are baked:


Then I dyed the frosting pink:


 I fed the kids and them had them ready for bed.  When hubby came home we put them to bed and had our Valentines dinner.  Since Valentine's day was on Monday this year we went out to dinner on Saturday then did something at home Monday night.  I threw together this from here:
 
 We had picked out a movie to watch after dinner.  Unfortunately we were too full to enjoy the treats.  I didn't eve realize until the kids opened the red hots the next day that they were red, pink, and white.  If I would've know that I would have bought more.  All sorts of ideas were popping in my head with those fun colors.  I'll have to watch for them next year!

 I also made this for the hubby (we just bought ourselves a bedroom set so that was our Valentine's Day present ~ this and the red hot basket and a card was all I bought this year).  Inside was 24 reasons why I loved him.  Oh, and I just printed it from here.