I love to do crafts and have cute handouts and activities for church (and school, and friends, and - well you get the idea). I don't consider myself creative, but often use the help of others' talents. I decided to share what I'm doing for others just like me. It may be a link to where I found something or it might even be something *I* created. Right now I work as a paraprofessional at my kids' elementary - in special ed (autism). I started creating items for my 3rd graders this year and can't wait to share them with you. I am the 1st counselor in YW (first time in YW is this past year). I also have ideas for cub scouts and sunbeams posted, my previous callings.
Showing posts with label Sunbeams. Show all posts

Monday, May 12, 2014

The Sabbath Day is a Day of Worship (Primary Manual 1, Lesson 15)


Sunbeam Lesson 15:
The Sabbath Day is a Day of Worship.

Today we finished our creation books:


I was going to take a picture of our church building, but forgot.  Fortunately there was a picture on our ward website on lds.org.  I just copied and pasted and then printed it off for the books.  You can take a picture of your building, see if your building is on lds.org, or just print a church building off the site.  I also printed two pictures to remind us about the sabbath day/day 7.  I had them cut and glued because we did another activity as well.  If you want to just have them cut and then glue the coloring will stay on the picture and not all over the page of the book.


We also made the creation on numbers today.  I will come back and add those to this post, but for now I want to get up this page.

If you choose to download, please become a follower first (on the right).  I'm happy to share my creations with my followers.  If you would like to leave a comment too that would totally make my day!

As I finish the other lessons I will post the links here:
Cover and Labels click here

Wednesday, August 7, 2013

I am Thankful for My Hands (Primary Manual 1, Lesson 17)


Sunbeam Lesson 17: I am Thankful for My Hands


We had a lot of fun today!  We talked about our hands and everything they can do and feel.  On half a piece of cardstock (landscape) I typed My Hands Can Feel Many Things! at the bottom and on the other side I typed My hands are unique!  I cut the sheet in half.  During class I traced their hands on each of the pieces.  On the paper that talked about feeling things we glued things they could touch/feel.  I just searched the house to find things I already had that were of different texture.  Here is the one I made ahead of time:
I cut the items at home so we could just glue them on (their hands are tiny, you need small pieces-smaller than I thought - I had to trim most of them). I also brought my hot glue gun to help them stick better.  Each finger had an item glued on and I found so many I put two more on the palm.  I ended up with felt, sandpaper, furry materiel, boa, cotton ball, bubble wrap, aluminum foil.  They loved to feel the different items.
With the other hand we talked about how each hand is unique.  I used a stamp pad to put their fingerprints on this hand (don't forget the baby wipes):

Those hands went in a gallon Ziploc baggie:
I placed a label on it so the parents knew what our lesson was all about:
In the bag I also included other things they can do with their hands:
Bubble wrap.  I also gave them a smaller piece to pop in class.  We did that during the lesson and then they had the large piece in their bag to pop at home.

This hand I printed off my Primary Partners CD.  It is double sided and glued together like a mitt.
 We eat with our hands so they had goldfish crackers:
 And I found this cute worksheet that they color with their hands (link at end of post with the downloads).

I forgot to add it before I took pictures, but clay (or play dough) was in there too.

The kids loved doing everything with their hands and taking home a bag of things to do.  Our lesson and making the hands filled the time, but if you had extra time they could color one of the sheets during class.


If you choose to download, please become a follower first (on the right).  I'm happy to share my creations with my followers.  If you would like to leave a comment too that would totally make my day!
Download Editable Labels (may lose font, but there are other labels on the sheet)
Download PDF Labels (the font will looked how I used it)
Link to church hands worksheet is here

Sunday, July 21, 2013

I Can Pray to Heavenly Father (Primary Manual 1, Lesson 4)


Lesson 4: I Can Pray to Heavenly Father

To help explain prayer I made a Bingo Sheet.   
Each column is a different part of prayer.  First column is the things we do when we pray.  The next column is different types of prayer - ways we pray, the third column are people we pray for, the fourth column has things we are thankful for, and the last column are things we can ask for.
There are six different Bingo Sheets.  You can give each child a set to play with their families or one sheet and play as a class.  I laminated each sheet.  We played as a class and then they took it home.  I meant to post this right after the lesson.  I was going to give them the link so they could print sheets to play as a family.

I also have a prayer tree that I started using many years ago (I won't say how long ago, but let you know I started teaching sunbeams right out of high school). But since it was so long ago it is a paper copy.  I need to work on getting it onto the computer because it is one of my favorites.

If you choose to download, please become a follower first (on the right).  I'm happy to share my creations with my followers.  If you would like to leave a comment too that would totally make my day!
 

We Can Pray as a Family (Primary Manual 1, Lesson 27)


Sunbeam Lesson 27: We Can Pray As a Family

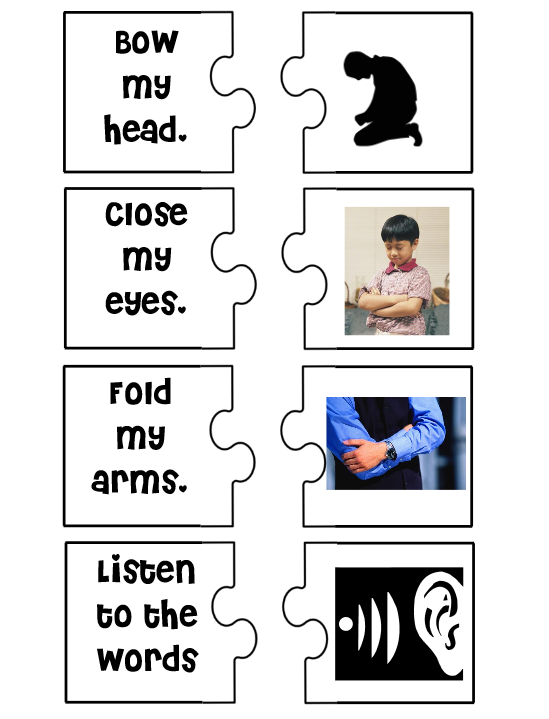
For this lesson I created a prayer puzzle:
I copied it on several colors.  Since they can't read I wanted each match to be a different color since the puzzles are all the same shape.  For example Bow My Head and the picture next to it was on blue cardstock, the next two (close my eyes & picture) were on green cardstock, then next two on red cardstock, and the next two on yellow cardstock.  The idea is to reinforce what they should be doing during the prayer. I then rotated the colors (first on green, second red, third yellow, fourth blue, etc).  I put every set in a ziplock bag to give the kids.

Earlier in the year (lesson 4) I also made Prayer Bingo.  It would work with this lesson as well:  
There are six different Bingo Sheets.  You can give each child a set to play with their families or one sheet and play as a class.  I laminated each sheet.  We played as a class and then they took it home.  I meant to post this right after the lesson.  I was going to give them the link so they could print sheets to play as a family.
Each column is a different part of prayer.  First column is the things we do when we pray.  The next column is different types of prayer - ways we pray, the third column are people we pray for, the fourth column has things we are thankful for, and the last column are things we can ask for.

If you choose to download, please become a follower first (on the right).  I'm happy to share my creations with my followers.  If you would like to leave a comment too that would totally make my day!


Saturday, July 6, 2013

Adam and Eve Were Created in Heavenly Father's Image (Primary Manual 1, Lesson 14)


Sunbeam Lesson 14: Adam and Eve Were Created in Heavenly Father's Image

This week we colored a picture of Adam and Eve for our books:

This next page went with this lesson, but the kids didn't actually see this until I gave them their completed book.  During the lesson we talked about how we are descendants of Adam and Eve and how we look like them and our Father in Heaven.  I took a picture of each child.  Had it printed and trimmed them just a bit.  I put colored cardstock behind it to give it a boarder.  On a mailing label I put their name, age, and the year.  Since the book has their finger and hand prints I'm assuming that this is something their parents will keep. 


 This is also a good day to finish up any pages that didn't get finished or need to be done because kids were absent.  I ended up with about 3 or 4 pages not totally finished in the end.


If you choose to download, please become a follower first (on the right).  I'm happy to share my creations with my followers.  If you would like to leave a comment too that would totally make my day!
So I lost a bunch of stuff I created for this book.  Well everything but the raindrops.  So I'm recreating/finding it.  I can't find the Adam and Eve I used, but here are several options for you (the first one is the closest, the last one is their family):
Download Adam and Eve Printable Here, Here, Here, and Here
 

As I finish the other lessons I will post the links here: 


For lesson 15 click here 
Cover and Labels click here

I Am Thankful for Birds and Insects (Primary Manual 1, Lesson 13)


Sunbeam Lesson 13: I Am Thankful for Birds and Insects

This is another fun lesson I have done in the past.  First I make binoculars.  You can do this with two empty toilet paper rolls or two rolled up pieces of cardstock.  Glue them together and punch a hole in each side.  Tie some string or yarn through the holes so that they can hang from their neck.  I also print bug jars and insects from my Primary Partners CD.  I did find one similar on Sugar Doodle (but the insects are different): http://c586449.r49.cf2.rackcdn.com/bugjar.pdf.  I cut out the jar and staple a Ziploc bag to it.  I color around each insect with marker.  Same insect = same color (all the bees are yellow, the crickets green, etc.).  I put painters tape rolled on the back covered with a piece of wax paper.  The wax paper removes easily and it is much faster to hang them with tape on them.  Before class I hang the bugs and insects around the classroom.  The kids come in and sit in their seats.  I give them their binoculars and then we start the lesson (after prayer of course). 

I bring in a lot of Eric Carle Books: The Very Hungry Catepillar, The Very Quiet Crickets, The Very Busy Spider, The Bad Tempered Lady Bug.  Plus I use the activities in the book for the bee, spider, and butterfly.  

First we talk about birds at the beginning of the lesson.  Then we move to the insects.  I read a story (for example The Very Quiet Cricket) and then I tell them to use their binoculars and go find a cricket to put in their jar.  I also tell them what color the cricket is.  There is a story or activity for each insect.  The kids love it!

Our page for our creation book:
It is hard to see but the top of this page is blue and the bottom is green.  I used their finger to make lady bugs, bees, a butterfly and a caterpillar.  When it is dry add details with a sharpie. If you need more of an explanation of how they were made leave me a comment.  If you click on the picture it should enlarge for you. Here are some more examples:


As I finish the other lessons I will post the links here: 
For lesson 15 click here
Cover and Labels click here

I Am Thankful for Animals (Primary Manual 1, Lesson 12)


Sunbeam Lesson 12: I Am Thankful for Animals

I downloaded an app for the ipad called I Hear Ewe.  It is a free app makes different animal sounds.  The kids loved guessing which animal made the sound.  I was able to play the sounds and start helping the kids on the next page of the book.

The page of the book looks like this:
To make the giraffe paint the whole hand yellow.  Place it on the paper upside down.  This makes the four legs and the tail.  Opposite of the tail you will make the neck.  Do this by painting the side of their palm (and pinky finger if you want) yellow.  You will need to use their finger to make the head.  Let them make dots with brown.  You may have to do this next week after the yellow paint has dried.  When it is dry use a brown marker for details and add a small googly eye.


As I finish the other lessons I will post the links here:


For lesson 15 click here
Cover and Labels click here

I Am Thankful for Fish (Primary Manual 1, Lesson 11)


Sunbeam Lesson 11: I Am Thankful for Fish.

This is actually one of my favorite lessons.  From back when I started teaching sunbeams at the age of 18 (yes, I demanded to be put into primary right out of high school so I could avoid going to relief society) I started this.  I must admit after being a mother I thought twice about it, but still did it because it is just so much fun and more importantly ~ the kids LOVE it!


What is all the excitement about?  Fish of course.  I give each child a fish to take home.  If I had more money (or a super small class) I would give them a beta fish, but since I don't, I give them a feeder fish.  You can buy them at any pet store that has fish or even Walmart.  Don't forget to pick up a jar of goldfish food.  I divvy it out into snack sized Ziploc bags.  This year I purchased some jars at Dollar Tree that look like fish bowls (I believe they are listed as candy bowls).  I put one fish in each of the bowls.  Be sure to buy extra fish because a few of them may not make it over night.  Also be prepared to talk the next week about death (this year the next week was Easter so it was perfect).  Most likely all but one will have died by then.  I have used jars in the past.  Just remember that they need air so you can't put a lid on them.

We also made a page for our creation book.  Actually, we ran out of time and I did it a different week, but this is the page that goes with the lesson:
This one is easy.  Take their hand and paint it orange, white, orange, white, orange.  Some people spread the fingers out, but I like them together.  The thumb down is the bottom fin.  When it is dry add a googly eye and bubbles.  Also you can draw a mouth on it.

I also give the kids a fish bowl with a plastic bag stapled to it and fishes cut out of paper.  They have a fishing pole made out of a Popsicle stick, string and a magnet.  All the fishes have paperclips on them so the kids can go fishing.  The kids love this as well.  I print mine off of the Primary Partners CD I have.

As I finish the other lessons I will post the links here:


For lesson 15 click here
Cover and Labels click here

I Am Thankful for Trees, Plants, and Flowers (Primary Manual 1, Lesson 10)


Sunbeam Lesson 10:
I Am Thankful for Trees, Plants, and Flowers

Another Lesson about the creation means another page for the creation book.  This page I actually started during the lesson, but I took couple weeks to finish it (the tree took a couple weeks to do in order to wait for the paint to dry):

First paint their fingers and the top of their palm green.  Place it at the bottom of the paper for the grass and stems.  Use their finger to make the flower.  I did the yellow centers first and then the petals.  The picture above has four petals, but it looks better with five petals.  Use the side of their palm and pinky finger and brown paint for the tree.  It will probably take two times ~ one stacked on top of each other.  I put more paint on the side of palm and pinky or just pinky to add branches.  After the branches dried they used their fingertips to add leaves.  They did this part a different week as I was helping another child paint the new page.  When that dried (the next week) we added apples with their finger tips.  Again, the child did that as I worked on the new project.  These would be much easier with two people, but I did them myself.

This one didn't get apples added to it.  You can see the branches better and it has five petals on the flowers.

We also planted flowers in paper cups.  I cut out a piece of paper that is shaped to wrap around the cup.  I let the kids decorate this and then I tape it on. I was going to do two cups, one with flowers and one with tomatoes, but do to time shortage we just did flowers.  I had the dirt in the cup already.  I gave them a few seeds to sprinkle around top and then we added a little more dirt.  We didn't water them in class so it wouldn't be so messy to transport home, but we talked about giving them water and sunlight.  We also sampled a bunch of fruits and veggies.

As I finish the other lessons I will post the links here:
For lesson 15 click here
Cover and Labels click here

Monday, March 11, 2013

A New Year of Sunbeams & Gift

They decided to keep me as the sunbeam teacher for 2013.  The only difference is that I'm teaching by myself.  The downside is that I have to plan a lesson every week instead of every other week and the upside is that I have to plan a lesson every week.

I decided to make my new sunbeams a gift.  I know that it is too late to do for this year, but it would make a great birthday or Christmas present.  Or save it for your sunbeam class next year.

I downloaded this free print from A Pocket Full of LDS Prints:

I printed them at home on my computer.  Then I mod podged them onto a 4x4 tile.  I used sandpaper to file off the edges of the paper.  Then I put an extra coat of mod podge on top.  They turned out SO CUTE!  Here is a picture of the finished project, but it isn't a very good picture. 

I am Thankfor for Day and Night (Primary Manual 1, Lesson 8)


Sunbeam Lesson 8:
I am Thankful for the Day and the Night

I posted Lesson 9 first so both of these posts will have some duplicate information.  So I apologize for that, but I want to make sure the introduction is here too


Lessons 8-15 talk about the Creation.  While they are titled I am Thankful for they talk about the creation.  I decided to make a book about the creation.  The lessons aren't necessarily in order of the creation.  But that doesn't matter because I'm keeping all the pages until the end.  As I do each lesson I will post it for you.

For each page in the book I'm cutting card stock in half.  Every lesson will have at least one page and some will have more which means our creation book will have more than seven pages.  

This lesson talks about the day and night.  I also covered the first day of the creation even though I'm not sure if the lesson covers it or not (guess I should blog closer to giving/preparing the lesson). All the first day is the separation of light and darkness so it leads right into this lesson and there isn't much else to cover.  For this page my cardstock was half white (I actually used more of a cream color) and black.

Then I used two pages for the rest of the lesson, one for day and one for night.  The day I used a blue piece of paper and night I used a black piece of paper.  I used my 1 3/8 circle punch and cut out yellow circles.  One of the yellow circles we are using for the sun and the other I cut into a crescent moon.  I cut two moons out of each circle. I also used yellow paint and glow in the dark paint and wipes.

I think it will be easier to see a picture first:

I put yellow paint on their index finger.  Taking their finger I made about 6 rays.  After the finger prints dried we glued on the yellow circles.  I haven't done it yet, but I'm going to make labels to put in the bottom corner of the page (day 1, day 2, etc).

Here is the night picture:

I gave them the moon to glue on their page.  I put glow-in-the-dark paint on a small disposable plate.  I asked them to dip their finger into the paint and dot it onto the paper.  If I had to do it again I would have an example because a few of them didn't know how to dot.  One thing to remember is that it needs a bit of paint in order to glow.  The fun thing about these pages is that the stars will glow in the dark!  I wish the classroom was dark enough to show the kids because they are excited about the glow-in-the-dark stars.

As I finish the other lessons I will post the links here:
For lesson 15 click here
Cover and Labels click here

Sunday, March 10, 2013

I am Thankful for Water (Primary Manual 1, Lesson 9)

Sunbeam Lesson 9:
I am Thankful for Water

My new goal (on top of everything else) is to try to post my Sunbeam lessons on here.  I have had lots of fun in the last year.  Reading others ideas and working in an elementary school has really helped me step it up (I started teaching sunbeams right out of high school - many moons ago).  My goal is to teach the spiritual doctrine in the lesson, but do it hands on so they learn, remember, and are able to tell their families all about it.

I will post last week's lesson soon, but I want to do today's while it is fresh in my memory (and I still need to take pictures of last week).  For the lessons 8-15 it talks about the Creation.  While they are listed as I am Thankful for lessons they talk about the creation.  We are in the process of making a book about the creation.  

The lessons aren't necessarily in order of the creation.  But that doesn't matter because I'm keeping all the pages until the end.  I still need to make a cover and other pages, but as I finish them I will post them.

For the book I'm cutting card stock in half for each page.  Every lesson will have at least one page and some will have more which means our creation book will have more than seven pages.  For this lesson I cut a light blue card stock in half.  I made this to go on it:
I cut them out and had them glued onto the blue paper so they just needed to color.  I left some room in the bottom right corner.  I'm going to make labels so they know which day of the creation it goes with.  I will take picture of the completed page, but I want to at least get this posted.  Each raindrop has something we need water for.  We talked about each one.
The other fun thing I did was a combination of ideas that I read about on sugardoodle.net.  My kids blew up some blue water balloons for me.  They are harder to blow up than they look.  I wanted to use these because they are small and I think they resemble raindrops.  We didn't have a lot of time during class, but at the end I gave each child a balloon and read the Raindrop Poem in the Enrichment activities.  They loved to throw the raindrops around and then I chased them back to their seats with a picture of a sun.  They were so excited to show their parents their raindrops!


If you choose to download, please become a follower first (on the right).  I'm happy to share my creations with my followers.  If you would like to leave a comment too that would totally make my day!


As I finish the other lessons I will post the links here:
For lesson 15 click here
Cover and Labels click here


Sunday, September 9, 2012

I Belong to a Family & I Love My Brothers and Sisters (Primary Manual 1, Lessons 23 & 24)


Sunbeam Lesson 23 - I Belong to a Family
Sunbeam Lesson 24 - I Love my Brothers and Sisters

First take a look at this post.

If I had to do it all again I would spread the chain out through all three lessons in which you talk about family.  Print out the chains (from the link above) and divide them between the three lessons - Lessons 23, 24, 25.  

For lesson 23 color the self link and parents link.
For lesson 24 color the brother & sister links.
For lesson 25 color the extended family links.

It took a lot of time to try and draw bodies on all the links and put them together (plan on teaching them how to draw stick figures the first lesson).  This will cut down on the coloring time and on the day of the last lesson you could have the chains linked together already minus the ones they will make that day.

Lesson 24: I Love My Brothers and Sisters.
We did the chains (above) and read a story about Moses.  They did a lot of talking about their brothers and sisters.  We talked about how to be kind to our siblings and how much we love them.  The kids then got to take a treat home to each sibling and a little note. A Kiss seems the perfect gift for a sister or brother.

I decided to make treats with a chocolate kiss on top.

Saturday, July 14, 2012

I Love My Whole Family (Primary Manual 1, Lesson 25)

Sunbeam Lesson #25, I Love My Whole Family

I was recently called to the Sunbeams.  My team teacher and I were formally nursery workers, but when both the sunbeam teachers were released they moved us up to Sunbeams.  I was very sad to leave my nursery class ~ I had a bunch of cute kids!  My Sunbeam class is cute too, they are just more challenging.  We are working hard at getting them to stay in their seats (Any suggestions?).  They have a short attention span.  I guess I should state that I have taught Sunbeams (and then the 4 year olds) for YEARS.  It has been awhile, but it is the calling I've had the most and the longest.  This bunch is a little harder to keep their attention and to keep seated.  I must say we had a great week last week, but we were also a little smaller.  I tell you this to let you know that I like lots of interaction and hands on.  I always search for ideas and hardly ever come up with my own.  Often I will borrow someones idea and recreate the same thing or something similar.  My first source is Sugardoodle.net (and I try to share back with her since I use so many things).  If you know any great site with ideas, please share.

Here is what I plan to do:
First we are going to make a family chain.  I found the original idea here, but made a few more chains and added color.  Each chain has a family member listed: me, parents, brother(s), sister(s), cousins, aunts, uncles, grandparents and a box to draw their family in.  At the bottom of this post are the downloads for black and white or color.  I chose to print the chains in color and the heart in black and white using red paper (which is a little thicker than copy paper, but not as thick as cardstock).  I also cut out and put each child's chain in an envelope (the same envelope will be sent to mail their letter - see next idea).  If they had multiple siblings I used the brothers or sisters, but if they only had one then I used the singular chain - brother or sister.

We are also going to mail hugs to an extended family member.  This idea I got here and I didn't change a thing.  I sent it home in an envelope already containing a postage stamp.  Hopefully the parents will just add an address and mail it off!

While at Costco we sampled a cereal that I hadn't heard about before:

Quaker Whole Heart is much like Cheerios, but heart shaped.  How fun is that?  Anyway, we are going to make bracelets with them.  They will have fun edible heart shaped bracelets that we will make as we talk about loving our whole family.

If you choose to download, please become a follower first (on the right).  I'm happy to share my creations with my followers.  If you would like to leave a comment too that would totally make my day!

Download Family Chain Here - Black & White
And since my daughter FINALLY colored in the stick people (I knew I should have done it myself) on the chains so I could have an example for the kids (and pictures for you), I decided that the chains would look better longer.  So I went it and fixed the documents so that they are.  If you wanted the longer chain version download below.

Download the Longer Family Chain Here - B&W
**Make sure you click landscape after the document comes up to print or it won't print correctly!**

If you have any questions or problems, let me know!

Sunday, July 8, 2012

I Have Feelings (Primary Manual 1, Lesson 21)

Sunbeam Lesson 21: I Have Feelings 
or
Behold Your Little Ones: Nursery Manual, Lesson 19: I Can Be Happy
I moved the tab so it wasn't right under the mouth.
I made this to go with my lesson in Sunbeams.  However, I was meaning to make it for Nursery during singing time for the song Smiles:
If you chance to meet a frown, 
Do not let it stay.
Quickly turn it upside down
And smile that frown away. 
No one likes a frowning face. 
Change it for a smile.
Make the world a better place
By smiling all the while.  
The kit I bought (I mentioned in my first singing time post that I have pictures for singing time) has something similar and the kids ALWAYS wanted a turn to do it, but since there was only one the singing leader always held it.  So when I came upon the Sunbeam lesson: I Have Feelings ~ and you were supposed to have a happy/sad face ~ I knew what I was going to make! {For those of you that teach Nursery it also goes with lesson 19 : I Can Be Happy.}
All you need to do is:
  • download (link at the bottom of this post), 
  • print (I recommend cardstock), 
  • cut (don't forget to cut out the two windows), and 
  • poke a brad through the star (line up the circles first so it goes through both sheets) ~ Teacher Tip: if you lay it on the carpet first it is easier to poke the brad through.
  • hold the top circle and use the tab to move the bottom circle.
If you choose to download, please become a follower first (on the right).  I'm happy to share my creations with my followers.  If you would like to leave a comment too that would totally make my day!