I love to do crafts and have cute handouts and activities for church (and school, and friends, and - well you get the idea). I don't consider myself creative, but often use the help of others' talents. I decided to share what I'm doing for others just like me. It may be a link to where I found something or it might even be something *I* created. Right now I work as a paraprofessional at my kids' elementary - in special ed (autism). I started creating items for my 3rd graders this year and can't wait to share them with you. I am the 1st counselor in YW (first time in YW is this past year). I also have ideas for cub scouts and sunbeams posted, my previous callings.

Sunday, September 9, 2012

Bulletin Board Make Over {Teacher Appreciation Week}

I have to preface this post.  I had the whole thing typed up and when I published it, it disappeared.  I had spent hours on it, twice, and I lost everything but my first paragraph and picture.  I was so frustrated I couldn't work on it. It was put off to work on later.  I guess now is later.  It may or may not be as long/detailed as before. 

For Teacher Appreciation week I saw some cute door make-overs over at Skip to My Lou.  I thought that it would be fun to do for my kids' teachers.  I decided to use their bulletin boards and make them over.
I loved the Recipe for Success idea and I had to use that one.   
This picture doesn't do it justice, it turned out much cuter than I can show you.  My plan was to buy a red and white checked table cloth, but I forgot to hit the party store to see if I could find one.  I did have red and white wrapping paper so I used that instead.  The title was cut out with a die cut machine (or cricut or silhouette would do the same thing):
I
If I had to do it again I would have put plain paper behind it so that it would be easier to read.  I then put on the recipe.
The top says Mrs. Yawberg has the recipe for success!  The recipe says: Take 11 boys and 16 girls. Sprinkle liberally with laughter and enthusiasm.  Marinate with creativity, knowledge and love.  Mix gently in a classroom.  Let simmer for 9 1/2 months.  This recipe make 27 students well prepared for Middle School.
I asked the students to write their own recipes of what make Mrs. Yawberg a successful teacher.  I photo copied their recipes and put them on the board:


I stapled paper plates, plastic cups, and utensils wrapped in napkins around the board. 
The original recipes I put in here:
 
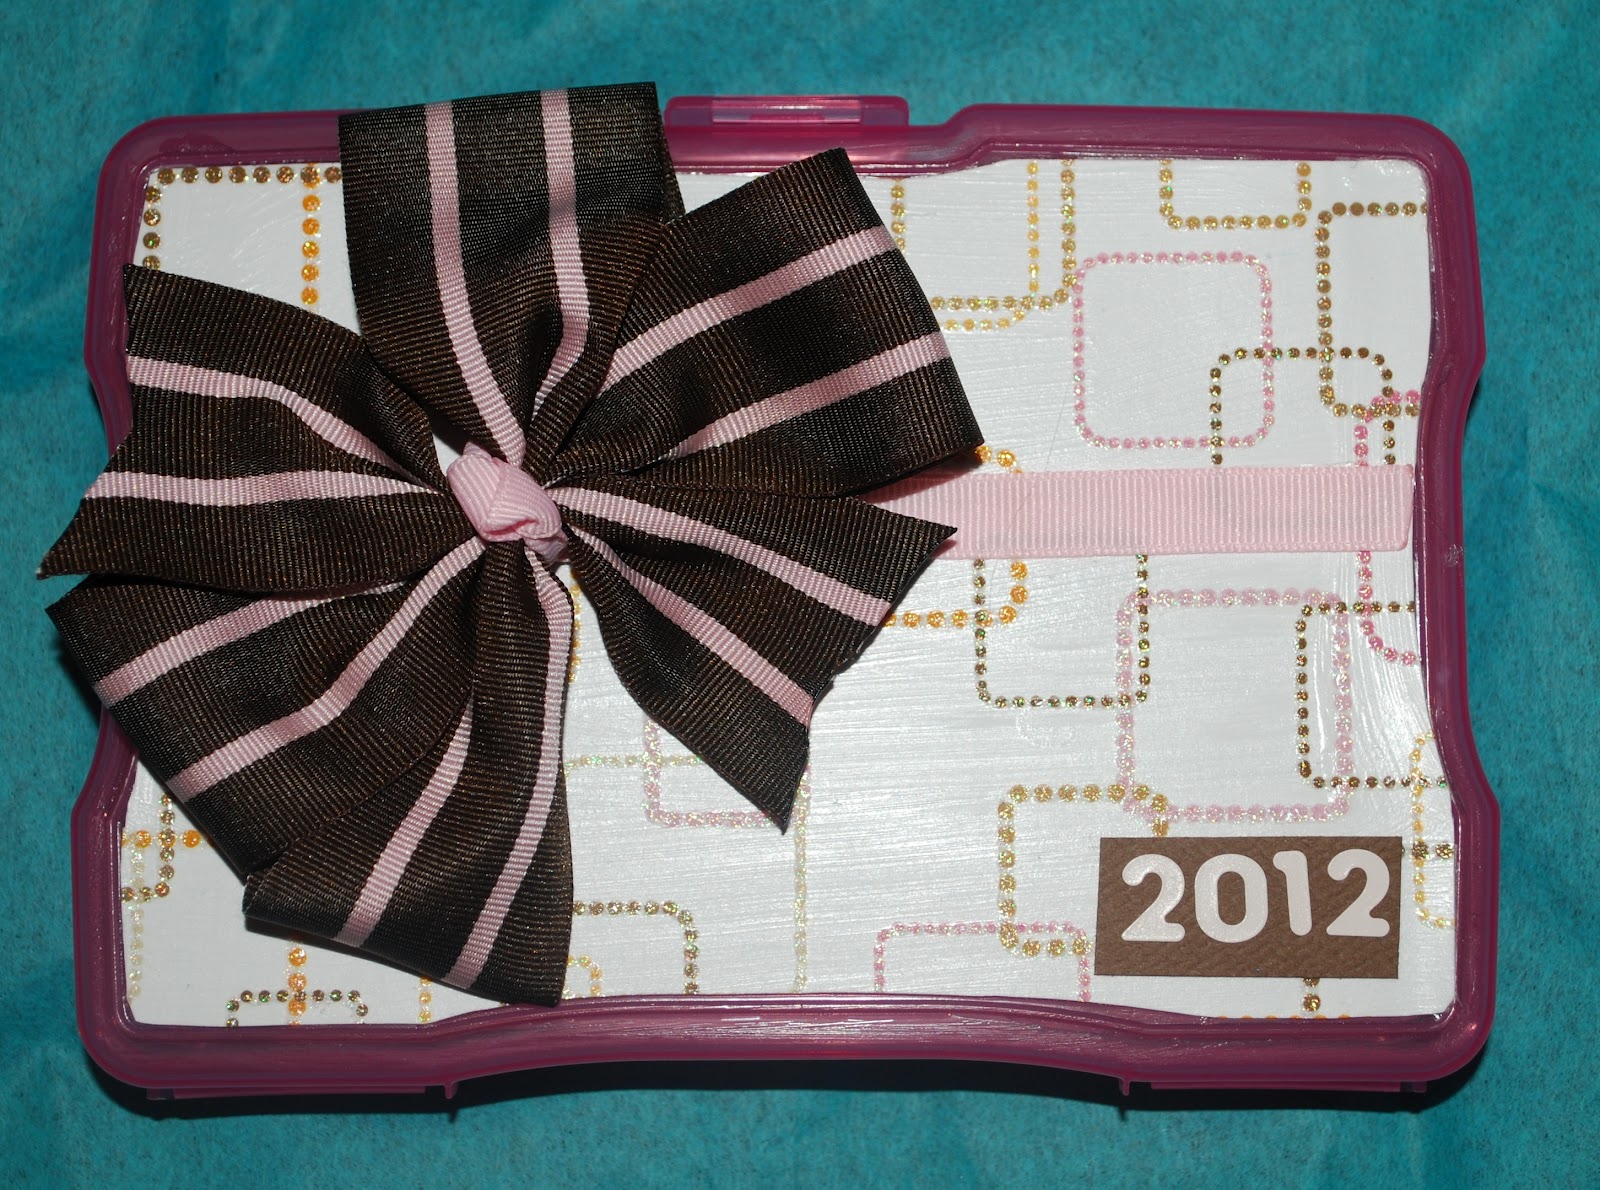
To make the holder I purchased a 4x6 photo holder from Micheals.  I mod podged paper onto the front.  I attached a coordinating ribbon with a tape runner.  I left a little gap to attach the bow. The bow on there is actually a barrette that I made.  I liked how it looked on it plus if she wanted to stack it she could remove the bow and have more room (or she could even use it in her daughter's hair).  I also put the year down in the corner.
To go along with the board I had the kids sign an apron.
I wrapped it all together with another teacher gift for the week:
 
The tag says 'We have to Ad-MITT, you are a great teacher!  Thanks for all you do!'  It was tied onto an oven mitt filled with cooking utensils and the apron wrapped around it.

We were going to get all the kids' pictures taken in an apron and chef's hat, but I didn't have the opportunity to go in there to do that.  I wanted to put their pictures on the board next to their recipes.  It would have been so cute and added so much more to it.

The other board we decorated (for our second grade teacher) we used the M&M theme.  I have used this years ago, but it is pretty popular now.  I found a cute poem to go with it.  
Here is the board:

The center of the boards says:
To make the boarder I cut out large circles (as large as I could get on 12x12 paper) in the color of m&m's.  I put part of the poem in each circle:

In between the large poem m&m's I put small ones.  In the center are m&m's that say 'Ms. Millson is magnificent because' and 'Ms. Millson is Marvelous because'.  The kids in her class each filled two of these out and then we hung them up:


For her treat we made her a bucket of M&M's complete with the poem. I found a clear paint can bucket and filled it with m&m's.  I tied ribbon along the side in the colors of the m&m's.
 I also slid in a copy of the poem.
Both teachers loved their boards!  It was a great end of school year board too.  I think there may have even been a few tears.

Download the M&M poem here (as seen in the can)

If you choose to download, please become a follower first (on the right).  I'm happy to share my creations with my followers.  If you would like to leave a comment too that would totally make my day!


I Belong to a Family & I Love My Brothers and Sisters (Primary Manual 1, Lessons 23 & 24)


Sunbeam Lesson 23 - I Belong to a Family
Sunbeam Lesson 24 - I Love my Brothers and Sisters

First take a look at this post.

If I had to do it all again I would spread the chain out through all three lessons in which you talk about family.  Print out the chains (from the link above) and divide them between the three lessons - Lessons 23, 24, 25.  

For lesson 23 color the self link and parents link.
For lesson 24 color the brother & sister links.
For lesson 25 color the extended family links.

It took a lot of time to try and draw bodies on all the links and put them together (plan on teaching them how to draw stick figures the first lesson).  This will cut down on the coloring time and on the day of the last lesson you could have the chains linked together already minus the ones they will make that day.

Lesson 24: I Love My Brothers and Sisters.
We did the chains (above) and read a story about Moses.  They did a lot of talking about their brothers and sisters.  We talked about how to be kind to our siblings and how much we love them.  The kids then got to take a treat home to each sibling and a little note. A Kiss seems the perfect gift for a sister or brother.

I decided to make treats with a chocolate kiss on top.

Back to School Teacher Gifts

The school year has began and the best way to start it is with a gift for the teacher.  This year I have two in middle school (13 teachers) one in elementary (1 teacher, 7 specialists).  The count is getting much higher. 
I had planned on giving these during open house to the elementary teacher & specialists, but I began work this week and didn't have time (and I found the idea the day before open house):
We made them for the first day of school instead.  I printed the the tags from here.  They had two per sheet and I chose to print them on an 8x11 page four times (8 tags) so each sheet is a little smaller than 2x3.  
Using bakers twine I tied three kit kats to the tag.  These we gave to the elementary specialists.  I didn't take a picture, but for the teacher I put one bag of (opened a bag of snack size) kit kats and three containers of Keurig coffee into some tissue paper.  I tied the top with red and white bakers twine and attached a tag.  We then slid the tissue into a red and white gift bag.
I had one bag of kit kats left.  We tied two kit kats to a tag and gave them to the elementary and middle school office staff and bus driver.  
For the middle school teachers I wanted to give them something useful.  I'm not sure if you know this or not (I didn't until I worked at the school), but Magic Erasers make EXCELLENT erasers for dry erase boards.  I picked some up along with some Expo Markers while they were on sale this summer.  I printed some tags and brought out the bakers twine.  Using coordinating colors I tied on the tags.
I used two different sayings for the tags:

The original idea for the 'spell' tag here
The other tag:
This tag used to say: You have been the write teacher for me!  For the original idea check out here (plus you can download the past tense there).

Each teacher was given one (I even had an extra one for the elementary teacher).  They now have a marker and an eraser to use in class that they don't have to spend their own funds on.  It may not be huge, but they will appreciate it.


If you choose to download, please become a follower first (on the right).  I'm happy to share my creations with my followers.  If you would like to leave a comment too that would totally make my day!

Saturday, September 8, 2012

Monthly School Idea: Sidewalk Chalk

Sorry for the delay.  There are so many posts I need to do still, and Surprisingly (not really) they are mainly teacher/school gifts.  I guess I have a soft spot in my heart for teachers.  

I recommend giving this gift when it is warm.  It could be in the fall or in the spring.  Since our schools don't start until September and we did the recess bag first, we saved this one for the spring. 
I bought a large box of sidewalk chalk and made some tags.  I attached the tag with lots of bright ribbon.  It pulled all the colors of the tag and the chalk together.  There are two to choose from:


Use your 3 inch circle punch for these.


You could use the top one and attach it to other teacher supplies: pens, markers, expo's, sharpies, etc. 


If you choose to download, please become a follower first (on the right).  I'm happy to share my creations with my followers.  If you would like to leave a comment too that would totally make my day!

Friday, August 31, 2012

Snack Holders

Another item from Pin Land. . .
And another item for the big drive across country!  My kids are a little old for this (at least a couple of them may be), but they liked it anyway.  The good thing about them being older is that the contents DID NOT end up on the floor of the van.  We had tons of snacks, but I wanted the kids to have access to some without me having to dish them out from the front seat.  I also tried to keep their items a little healthier than just candy.

First at Micheal's 40% off sale I purchased beading storage boxes.  Yes, it is worth paying extra money for removable dividers.  At first I thought I would need the big boxes - that is a lot of snacks, even for across country!  As you can see mine had two rows with five sections in them.  Plenty of treats.  Not to mention I had more of just about everything so I could fill them up if needed (I only needed to fill them up for the return home).  Here is what the three looked like.  The boy is picky and won't eat any nuts.  His is the least healthy.


I dug out my vinyl, circut, and gypsy (because on the gypsy you can design multiple cuts at once).  I decided to pick a cute shape and cut the letters out of it.  I also knew it would be easier to apply to the boxes (since I have yet to purchase the transfer paper).  Each kid picked out a color from what I had on hand.  Some had just their name cut out and some had their name and the word snacks.  As I'm thinking about it now if you just put their name they can use them for other things (like those pesky barbie shoes that end up all over the place - we use one of the big boxes for this very purpose).

Fill with snacks that your kids will eat.  It is great to keep in the diaper bag so you always have a variety. Or in the car for when you are gone longer than planned. Or maybe even in your desk at work.  If you have larger snacks just remove the dividers to make a little extra room.  Hmmm, I wonder where I put my extra dividers at?  Might need to find a home to store those.
  
If you like this post or are going to use it, please take the time to be a follower first.  I also love hearing from you!  Thanks to those who take a little extra time to leave a comment :)

Another Travel Post - Personal Hygiene Holder

Have you seen these on Pinterest?
I was thinking it would be a good idea to have.  I can't name how many times my kids have taken their stuff to a sleepover and left it or forgotten to put it back.  I thought this would be a good thing to have not only for our trip, but for future sleepovers.  I love the idea that if the toothbrush is still wet that it is in something that can not only let it dry, but is washable.

Here is what I did to make them.
Buy a 12x12 wash cloth.  You can get 2 for $1 at the dollar store.  That is what I started with to try it out.  When it worked I used a couple I already had at home.  The picture above sews every 3 inches.  I decided I didn't need a 3 inch section for my toothbrush and made some modifications.
For my son I sewed up the edges first.  
From the left edge I sewed another vertical line 2 inches away (this is huge for a toothbrush,  you can go much smaller if you wanted), then I gave another 3 inches for toothpaste, and the next section was 4 inches for deodorant.  This left 3 inches for a comb.  I used a small comb for him so that it fit in the pocket and didn't extend to get dirty from the wet toothbrush.

For my daughters I took a small piece of ribbon.  I sewd velcro on the ends so it could form a loop.  I took the middle and sewed it onto the edge of the washcloth:


Then I basically followed the same as for the boy. I used a tail comb for the girls so that the comb part fit in the pocket and didn't extend to get dirty from the wet toothbrush (the tail did, but that shouldn't get in their hair or can be easily cleaned before use).
After that I attached the ribbon.  Since the pockets aren't snug I pictured everything sliding out so I made another change here too.  I sewed ribbon on the edge at the middle and at the top.  The middle ribbon is 2 feet (I did smaller on the boys and it is a little harder to tie) and 18 inches on the top.  I just did a straight seam with the wrong side down facing the outside.  
I also heat sealed my ribbon so it wouldn't fray.  To do this just run the edge of the ribbon quickly through a flame (candle or lighter).  Then just roll it up and tie the ribbons.  
After this trip they will be used for sleepovers.  Everything they need will all be ready to go.  And when it gets wet or dirty, just throw it in the laundry!  Gotta love that!

Now that I have traveled here is what I have learned: you can make the sections smaller.  If you add more sections you made need to add length to the ribbon closures because they will be adding stuff and that will make it thicker when rolled.  My girls found all sorts of things to add and could have used more pockets.  My oldest ended up putting her comb behind her toothbrush (not sure if it stayed clean that way because she uses a brush most the time and probably could have left the comb out) and put some perfume where in the pocket.  My youngest doesn't wear deodorant so she used the pockets for perfume and body glitter.  To think at first I was wondering what to put in all the pockets, the girls figured it out for me.  I LOVE the loop to hold elastics.  That was very handy.


If you like this post or are going to use it, please take the time to be a follower first.  I also love hearing from you!  Thanks to those who take a little extra time to leave a comment :)

Sunday, August 12, 2012

Vacation

Well, I survived the drive across country.  We left about 5 pm Wednesday night and traveled 2200 miles arriving at our destination by 7:00 Friday night.  We are planning on it taking more than double that time to get home.  One of those days will be spent at Nauvoo sight seeing. 
I hoped to do a little blogging while I was here, but my laptop wouldn't fit in the over-crowded car.  I even downloaded and edited pictures so they would be all ready to go on it. 
So far we have had lots of fun with cousins - parks, dinners, amusement parks, baseball games, family pictures - and had the opportunity to attend two wedding receptions. 
I will only be home a week before I have to go back to school so hopefully I can get some posts done before then (along with the unpacking, laundry washing, school shopping, etc).
I hope you are enjoying your summer and will post as soon as I can, but probably not for another 10 days or so.