I love to do crafts and have cute handouts and activities for church (and school, and friends, and - well you get the idea). I don't consider myself creative, but often use the help of others' talents. I decided to share what I'm doing for others just like me. It may be a link to where I found something or it might even be something *I* created. Right now I work as a paraprofessional at my kids' elementary - in special ed (autism). I started creating items for my 3rd graders this year and can't wait to share them with you. I am the 1st counselor in YW (first time in YW is this past year). I also have ideas for cub scouts and sunbeams posted, my previous callings.

Monday, March 11, 2013

I am Thankfor for Day and Night (Primary Manual 1, Lesson 8)


Sunbeam Lesson 8:
I am Thankful for the Day and the Night

I posted Lesson 9 first so both of these posts will have some duplicate information.  So I apologize for that, but I want to make sure the introduction is here too


Lessons 8-15 talk about the Creation.  While they are titled I am Thankful for they talk about the creation.  I decided to make a book about the creation.  The lessons aren't necessarily in order of the creation.  But that doesn't matter because I'm keeping all the pages until the end.  As I do each lesson I will post it for you.

For each page in the book I'm cutting card stock in half.  Every lesson will have at least one page and some will have more which means our creation book will have more than seven pages.  

This lesson talks about the day and night.  I also covered the first day of the creation even though I'm not sure if the lesson covers it or not (guess I should blog closer to giving/preparing the lesson). All the first day is the separation of light and darkness so it leads right into this lesson and there isn't much else to cover.  For this page my cardstock was half white (I actually used more of a cream color) and black.

Then I used two pages for the rest of the lesson, one for day and one for night.  The day I used a blue piece of paper and night I used a black piece of paper.  I used my 1 3/8 circle punch and cut out yellow circles.  One of the yellow circles we are using for the sun and the other I cut into a crescent moon.  I cut two moons out of each circle. I also used yellow paint and glow in the dark paint and wipes.

I think it will be easier to see a picture first:

I put yellow paint on their index finger.  Taking their finger I made about 6 rays.  After the finger prints dried we glued on the yellow circles.  I haven't done it yet, but I'm going to make labels to put in the bottom corner of the page (day 1, day 2, etc).

Here is the night picture:

I gave them the moon to glue on their page.  I put glow-in-the-dark paint on a small disposable plate.  I asked them to dip their finger into the paint and dot it onto the paper.  If I had to do it again I would have an example because a few of them didn't know how to dot.  One thing to remember is that it needs a bit of paint in order to glow.  The fun thing about these pages is that the stars will glow in the dark!  I wish the classroom was dark enough to show the kids because they are excited about the glow-in-the-dark stars.

As I finish the other lessons I will post the links here:
For lesson 15 click here
Cover and Labels click here

Sunday, March 10, 2013

I am Thankful for Water (Primary Manual 1, Lesson 9)

Sunbeam Lesson 9:
I am Thankful for Water

My new goal (on top of everything else) is to try to post my Sunbeam lessons on here.  I have had lots of fun in the last year.  Reading others ideas and working in an elementary school has really helped me step it up (I started teaching sunbeams right out of high school - many moons ago).  My goal is to teach the spiritual doctrine in the lesson, but do it hands on so they learn, remember, and are able to tell their families all about it.

I will post last week's lesson soon, but I want to do today's while it is fresh in my memory (and I still need to take pictures of last week).  For the lessons 8-15 it talks about the Creation.  While they are listed as I am Thankful for lessons they talk about the creation.  We are in the process of making a book about the creation.  

The lessons aren't necessarily in order of the creation.  But that doesn't matter because I'm keeping all the pages until the end.  I still need to make a cover and other pages, but as I finish them I will post them.

For the book I'm cutting card stock in half for each page.  Every lesson will have at least one page and some will have more which means our creation book will have more than seven pages.  For this lesson I cut a light blue card stock in half.  I made this to go on it:
I cut them out and had them glued onto the blue paper so they just needed to color.  I left some room in the bottom right corner.  I'm going to make labels so they know which day of the creation it goes with.  I will take picture of the completed page, but I want to at least get this posted.  Each raindrop has something we need water for.  We talked about each one.
The other fun thing I did was a combination of ideas that I read about on sugardoodle.net.  My kids blew up some blue water balloons for me.  They are harder to blow up than they look.  I wanted to use these because they are small and I think they resemble raindrops.  We didn't have a lot of time during class, but at the end I gave each child a balloon and read the Raindrop Poem in the Enrichment activities.  They loved to throw the raindrops around and then I chased them back to their seats with a picture of a sun.  They were so excited to show their parents their raindrops!


If you choose to download, please become a follower first (on the right).  I'm happy to share my creations with my followers.  If you would like to leave a comment too that would totally make my day!


As I finish the other lessons I will post the links here:
For lesson 15 click here
Cover and Labels click here


Sunday, March 3, 2013

PI 3.14 Day, DIY Pie on a Stick

Pi day is March 14.  Why? Because pi = 3.14 and PIE backwards is 314.


My daughter's middle school has Pie day on 3/14 (March 14) and the parents make pies for the school to sell by the slice as a fundraiser.  So instead of making a traditional pie we made pie on a stick.  I also wanted to give a little treat to the teachers.

First roll out your crust.  I used Pillsbury frozen crusts and rolled them out.  Take a round cookie cutter or biscuit cutter and cut the dough - you will need 2 of each circle.  Place the circles on a cookie sheet leaving room for sticks.


Place the sticks on the circles.  I used the large sticks.


We used apple pie filling from a can.  Scoop it out - not too much, about two apples.  Place another circle on top and seal it closed.  We used the end of one of the sticks to push it together.


Spread some egg white on top and sprinkle on some cinnamon sugar.


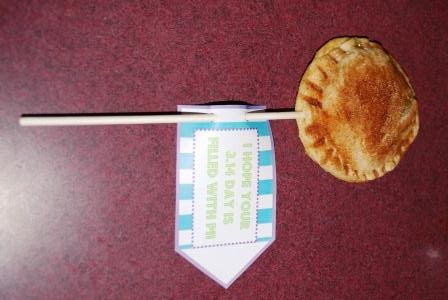
Cook it according to the directions on the package of the crust.  Keep an eye on it.  Print out the tags, cut out, punch, and slide onto the stick.


Here is a closer look of the tag:


If you choose to download, please become a follower first (on the right).  I'm happy to share my creations with my followers.  If you would like to leave a comment too that would totally make my day!  

Download the tag here.

See my Link Party page to view Parties I've linked to.


Friday, March 1, 2013

Hats and Rainbows - St. Patrick's Day

So I realized that I never posted what I did last year for St. Patrick's Day.  Probably because I was still finishing them as I was running out the door.  Then I figured why would you need to know right after St. Patrick's Day?  I'm working on several posts right now, but since this holiday is quickly approaching I will finish it first.  To see all my St. Patrick's Day posts go here.

I made these for the kids and their teachers:
I apologize for the pictures.  Just take note that the paint scrapes off easily after it has been sprayed.  It needs some time to dry completely so it doesn't scrape off.

I just purchased the small Glad Containers:
I laid them out on newspaper:
Carefully spray paint them green:
Let them dry.  Hopefully you have a few days to let them dry so the cure all the way.  
I didn't get pictures of the next step, but wrap black ribbon around the base of the hat.  I cut out the buckles with my cricut and gypsy using glitter yellow paper.  I like the black ribbon with the white stitching best.
After they are dry you can fill them with with treasure and rainbow (or favorite treats, or gold coins, etc).  I used Rolos and skittles: 
I put the Rolos in first like gold treasure and then covered them up with a rainbow:
I don't think that I did, but you could use one of the tags I have made previously:
Those printables are found at the link above.

For dinner I went with the rainbow theme:

Rainbow Balloons hanging from the ceiling in an arc.


Individual Rainbow Fruit.  I like the fruit rainbow I made better, but these are quick and easy too.


Rainbow Jello.  
I made each color one at a time.  I decided to pour them into glasses instead of a glass pan.  It is a lot of Jello to eat though.  It took a few days, but this way I only had to use a small box of jello of each color.


I topped the jello with a cloud of cool whip.


I didn't use this for St. Patrick's Day, but I wanted to try it out.  Put food coloring in the water and then add the pasta to cook.  Obviously the red dye works better.  The one thing I remember thinking was that I needed to add more food coloring, more than you would think.  I haven't tried it again, but it is kind of fun.

See Link Party page for parties I have linked to.

Sunday, February 24, 2013

Date Night

Just because this comes up when I'm trying to write posts I figure I should just share it with you.  We have done this for several years (at least 5, but probably closer to 6) and we did a smaller version when we lived in Utah.
We have four families that participate.  For a time we had five and at times that was a little much, but four seems to work out well.  Basically what happens is that we rotate between families turns watching all four families children.  For example on the first week it is our turn to watch all the kids while the other three couples go out on a date.  Then the next three weeks we are kid free and have dating opportunities.  Since we live where the commute is awful and husbands get home late we do our date night on Saturday night.  It is four hours long.  We have switched start and end times.  When church started at 9:00 we went 5:00-9:00.  The bad thing about this is that it is almost impossible to go to the movies.  We had 6:00-10:00 at one time.  It was always a late night for the kids (and sometimes for the ones watching them).  Right now we go 5:30-9:30 and it seems to work well.
Some of the things that we worked out:  If you can't go you don't.  If it is your turn to babysit and you can't then you trade days with another family.  If we all have something the same night (usually a church activity) we skip that week and continue the rotation.  We always have a snack.  At one time we talked about doing dinner, but we don't.  Sometimes we will bring a Little Caesar's pizza home and feed everyone.  We usually have to feed our kids a snack before bedtime (another reason I like the 9:30 end time over the 10:00) after we pick them up.  When a family moves we ask another family to join.  All the families currently involved have 3 kids.  One family their oldest has never come and often my oldest goes with her friends and isn't there either.
It works out really well and gives us at least three dates a month.  Often we end up at home catching up on shows and eating Chinese food, but we have that quality alone time. The kids love it because it gives them a time to be able to play with their friends.  Our group is formed up of church friends and they often only get to see them at church (two of the families go to different schools).  I highly recommend doing this if you have young kids.

Monday, February 11, 2013

Mustache Valentines

Mustaches are all the rage.  This is actually the third year my daughter(s) has been into mustaches.  Our first mustache project I shared was for Valentine's Day 2011, last year she went with chocolate covered marshmallows and this year we are back to mustaches.  We had all sorts of fun with her birthday party last summer too.
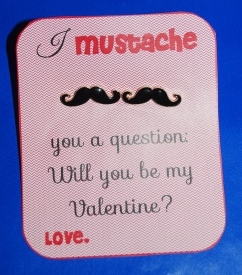
I created a bunch of mustache themed Valentines.  Some we will use and some are just for you!  Two sets were inspired from some great Amazon deals: adhesive mustaches (you can find these anywhere, even at the dollar store) and mustache earrings.  My original plan was for Boo to give the girls in her class mustache earrings and the boys adhesive mustaches, but much to my dismay I learned that there are a lot of 8-9 year old girls who don't have their ears pierced yet.  So her class will receive the adhesive mustaches and the teen will give the earrings to her friends.
Here is what I came up with for the adhesive mustaches:

I intended the first mustache saying to be used with the mustache earrings, but work well with the adhesive mustaches.  The saying just is used a lot, but that is all I could come up with for mustache earrings.  They were less than $1 each on Amazon with free shipping.  They take a long time to get here so if you want to do this order them for next year. 

You can also use the "stick" one with a stick or package of gum. Or even a package of paperclips or staples for your teacher.


I also made one that you can just print (no earring, gum, adhesive mustaches required).  These are designed to go on the jumbo craft sticks.  These sticks can be found in any craft store.  I bought a large box at Wal-mart.


For some reason I couldn't get the chevron background to print correctly on most of them (and of course I didn't find this out until working on them for hours).  They will print from Microsoft word, but not from a PDF file.  Unfortunately if you don't have the same fonts on your computer they won't look right if you try to print for word.  I tried changing up the background for you, but I still had problems.  So I decided to take out the background and print it on colored patterned paper (it is actually cheaper this way because it saves a lot of ink).  I picked up a package of 12 sheets of paper in the Valentine dollar section at Target:


Here are all your downloads and as always: If you choose to download, please become a follower first (on the right).  I'm happy to share my creations with my followers.  If you would like to leave a comment too that would totally make my day!
 

If you have and questions, problems, or comments, leave me a message!
Here are a couple more downloads for the craft sticks:
I'm out of magenta ink so I haven't printed all of these.  If there is a problem, let me know.  If I was selling them I would triple check everything, but since they are freebies I'm relying on you for feedback.

Scroll down for last year's Valentines.  That post also has a link to the Valentines made the year before!


I linked with

Monday, January 14, 2013

DIY Valentine's Gifts

I never posted the Valentine's gifts I made last year so in case you are looking for ideas here is what we did:
I made some salt dough (play dough) for my first grade class that I go into.  I dyed it red and I rolled it out.  Using a cookie cutter I cut it into heart shapes.  I put one heart into a snack size baggie (there was room that I could have put two in each bag) and stapled a Valentine's Topper over the zipper of the bag:
Actually, I cut out a topper out of cardstock, folded it over the bag, stapled.  Then printed off the saying onto regular paper and used a tape runner to place it over the cardstock.  That way you don't see any staples.

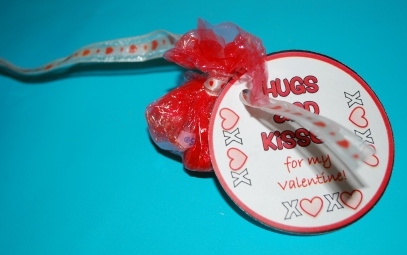
My youngest gave out hugs and kisses:
First I took some Valentine kisses and wrapped them in red saran wrap and tied it with valentine ribbon (don't cut the ribbon yet):
Slide on the tag:
And tie it around a Hug barrel drink (I bought them at Walmart):
Slide in the straw, trim your ribbon and you have a gift of Hugs and Kisses!

If you have the mini zip top bags that you can find in the craft store you can use thoseYou can use those two ways: 1- fill with hugs and kisses OR 2- fill with kisses and attach to a hugs barrel drink (like above).  These are cute, but I didn't have enough left for the whole class.  I made these the same way as the dough. 
 
Last year owls were all the range and I incorporated them into my son's Valentine's.  His class didn't really do an exchange, but we made some anyway.  I had come across a great deal on scented pencils (a bucket of them) over the summer and bought them.  My kids loved them so I knew the 5th graders would too.  I used my cricut to cut out owl shapes (you could use clip art).  I had two ideas:


We ended up using the first one (click on the pictures to enlarge).  I cut out the owls and then printed the saying on labels and stuck them on the back.  We taped on the pencil towards the bottom - we wanted it to be like a branch.  The second idea was shaped more like a traditional valentine with the saying at the top and a branch at the bottom.  I cut slits into the paper to slide the pencil in on the branch.  Here is a close up of the saying - he didn't want it lovey dovey, he is a 10 year old boy (you could use valentine instead of friend, but he chose friend):


If you still need ideas check out this post for fun saying/tags or the post from the year before here.  You can view instructions/download tags for:


You could also use mini flashlights or glow sticks for this tag.


Linking up here: