I love to do crafts and have cute handouts and activities for church (and school, and friends, and - well you get the idea). I don't consider myself creative, but often use the help of others' talents. I decided to share what I'm doing for others just like me. It may be a link to where I found something or it might even be something *I* created. Right now I work as a paraprofessional at my kids' elementary - in special ed (autism). I started creating items for my 3rd graders this year and can't wait to share them with you. I am the 1st counselor in YW (first time in YW is this past year). I also have ideas for cub scouts and sunbeams posted, my previous callings.

Sunday, July 21, 2013

I Can Pray to Heavenly Father (Primary Manual 1, Lesson 4)


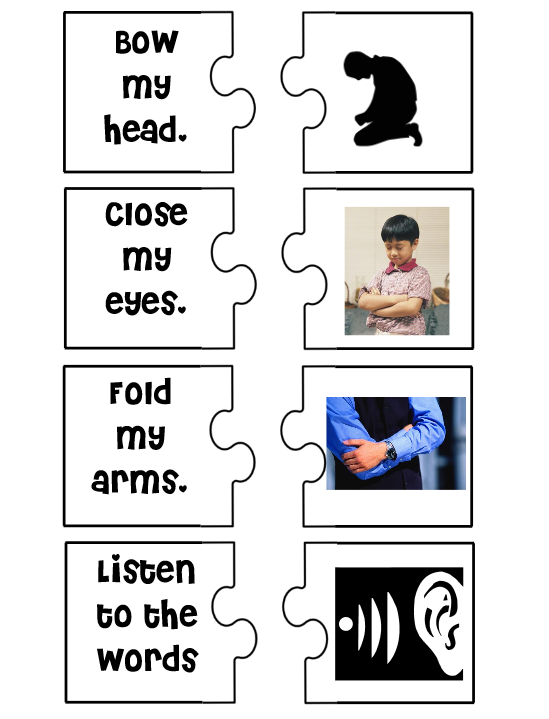
Lesson 4: I Can Pray to Heavenly Father

To help explain prayer I made a Bingo Sheet.   
Each column is a different part of prayer.  First column is the things we do when we pray.  The next column is different types of prayer - ways we pray, the third column are people we pray for, the fourth column has things we are thankful for, and the last column are things we can ask for.
There are six different Bingo Sheets.  You can give each child a set to play with their families or one sheet and play as a class.  I laminated each sheet.  We played as a class and then they took it home.  I meant to post this right after the lesson.  I was going to give them the link so they could print sheets to play as a family.

I also have a prayer tree that I started using many years ago (I won't say how long ago, but let you know I started teaching sunbeams right out of high school). But since it was so long ago it is a paper copy.  I need to work on getting it onto the computer because it is one of my favorites.

If you choose to download, please become a follower first (on the right).  I'm happy to share my creations with my followers.  If you would like to leave a comment too that would totally make my day!
 

We Can Pray as a Family (Primary Manual 1, Lesson 27)


Sunbeam Lesson 27: We Can Pray As a Family

For this lesson I created a prayer puzzle:
I copied it on several colors.  Since they can't read I wanted each match to be a different color since the puzzles are all the same shape.  For example Bow My Head and the picture next to it was on blue cardstock, the next two (close my eyes & picture) were on green cardstock, then next two on red cardstock, and the next two on yellow cardstock.  The idea is to reinforce what they should be doing during the prayer. I then rotated the colors (first on green, second red, third yellow, fourth blue, etc).  I put every set in a ziplock bag to give the kids.

Earlier in the year (lesson 4) I also made Prayer Bingo.  It would work with this lesson as well:  
There are six different Bingo Sheets.  You can give each child a set to play with their families or one sheet and play as a class.  I laminated each sheet.  We played as a class and then they took it home.  I meant to post this right after the lesson.  I was going to give them the link so they could print sheets to play as a family.
Each column is a different part of prayer.  First column is the things we do when we pray.  The next column is different types of prayer - ways we pray, the third column are people we pray for, the fourth column has things we are thankful for, and the last column are things we can ask for.

If you choose to download, please become a follower first (on the right).  I'm happy to share my creations with my followers.  If you would like to leave a comment too that would totally make my day!


Saturday, July 6, 2013

Adam and Eve Were Created in Heavenly Father's Image (Primary Manual 1, Lesson 14)


Sunbeam Lesson 14: Adam and Eve Were Created in Heavenly Father's Image

This week we colored a picture of Adam and Eve for our books:

This next page went with this lesson, but the kids didn't actually see this until I gave them their completed book.  During the lesson we talked about how we are descendants of Adam and Eve and how we look like them and our Father in Heaven.  I took a picture of each child.  Had it printed and trimmed them just a bit.  I put colored cardstock behind it to give it a boarder.  On a mailing label I put their name, age, and the year.  Since the book has their finger and hand prints I'm assuming that this is something their parents will keep. 


 This is also a good day to finish up any pages that didn't get finished or need to be done because kids were absent.  I ended up with about 3 or 4 pages not totally finished in the end.


If you choose to download, please become a follower first (on the right).  I'm happy to share my creations with my followers.  If you would like to leave a comment too that would totally make my day!
So I lost a bunch of stuff I created for this book.  Well everything but the raindrops.  So I'm recreating/finding it.  I can't find the Adam and Eve I used, but here are several options for you (the first one is the closest, the last one is their family):
Download Adam and Eve Printable Here, Here, Here, and Here
 

As I finish the other lessons I will post the links here: 


For lesson 15 click here 
Cover and Labels click here

I Am Thankful for Birds and Insects (Primary Manual 1, Lesson 13)


Sunbeam Lesson 13: I Am Thankful for Birds and Insects

This is another fun lesson I have done in the past.  First I make binoculars.  You can do this with two empty toilet paper rolls or two rolled up pieces of cardstock.  Glue them together and punch a hole in each side.  Tie some string or yarn through the holes so that they can hang from their neck.  I also print bug jars and insects from my Primary Partners CD.  I did find one similar on Sugar Doodle (but the insects are different): http://c586449.r49.cf2.rackcdn.com/bugjar.pdf.  I cut out the jar and staple a Ziploc bag to it.  I color around each insect with marker.  Same insect = same color (all the bees are yellow, the crickets green, etc.).  I put painters tape rolled on the back covered with a piece of wax paper.  The wax paper removes easily and it is much faster to hang them with tape on them.  Before class I hang the bugs and insects around the classroom.  The kids come in and sit in their seats.  I give them their binoculars and then we start the lesson (after prayer of course). 

I bring in a lot of Eric Carle Books: The Very Hungry Catepillar, The Very Quiet Crickets, The Very Busy Spider, The Bad Tempered Lady Bug.  Plus I use the activities in the book for the bee, spider, and butterfly.  

First we talk about birds at the beginning of the lesson.  Then we move to the insects.  I read a story (for example The Very Quiet Cricket) and then I tell them to use their binoculars and go find a cricket to put in their jar.  I also tell them what color the cricket is.  There is a story or activity for each insect.  The kids love it!

Our page for our creation book:
It is hard to see but the top of this page is blue and the bottom is green.  I used their finger to make lady bugs, bees, a butterfly and a caterpillar.  When it is dry add details with a sharpie. If you need more of an explanation of how they were made leave me a comment.  If you click on the picture it should enlarge for you. Here are some more examples:


As I finish the other lessons I will post the links here: 
For lesson 15 click here
Cover and Labels click here

I Am Thankful for Animals (Primary Manual 1, Lesson 12)


Sunbeam Lesson 12: I Am Thankful for Animals

I downloaded an app for the ipad called I Hear Ewe.  It is a free app makes different animal sounds.  The kids loved guessing which animal made the sound.  I was able to play the sounds and start helping the kids on the next page of the book.

The page of the book looks like this:
To make the giraffe paint the whole hand yellow.  Place it on the paper upside down.  This makes the four legs and the tail.  Opposite of the tail you will make the neck.  Do this by painting the side of their palm (and pinky finger if you want) yellow.  You will need to use their finger to make the head.  Let them make dots with brown.  You may have to do this next week after the yellow paint has dried.  When it is dry use a brown marker for details and add a small googly eye.


As I finish the other lessons I will post the links here:


For lesson 15 click here
Cover and Labels click here

I Am Thankful for Fish (Primary Manual 1, Lesson 11)


Sunbeam Lesson 11: I Am Thankful for Fish.

This is actually one of my favorite lessons.  From back when I started teaching sunbeams at the age of 18 (yes, I demanded to be put into primary right out of high school so I could avoid going to relief society) I started this.  I must admit after being a mother I thought twice about it, but still did it because it is just so much fun and more importantly ~ the kids LOVE it!


What is all the excitement about?  Fish of course.  I give each child a fish to take home.  If I had more money (or a super small class) I would give them a beta fish, but since I don't, I give them a feeder fish.  You can buy them at any pet store that has fish or even Walmart.  Don't forget to pick up a jar of goldfish food.  I divvy it out into snack sized Ziploc bags.  This year I purchased some jars at Dollar Tree that look like fish bowls (I believe they are listed as candy bowls).  I put one fish in each of the bowls.  Be sure to buy extra fish because a few of them may not make it over night.  Also be prepared to talk the next week about death (this year the next week was Easter so it was perfect).  Most likely all but one will have died by then.  I have used jars in the past.  Just remember that they need air so you can't put a lid on them.

We also made a page for our creation book.  Actually, we ran out of time and I did it a different week, but this is the page that goes with the lesson:
This one is easy.  Take their hand and paint it orange, white, orange, white, orange.  Some people spread the fingers out, but I like them together.  The thumb down is the bottom fin.  When it is dry add a googly eye and bubbles.  Also you can draw a mouth on it.

I also give the kids a fish bowl with a plastic bag stapled to it and fishes cut out of paper.  They have a fishing pole made out of a Popsicle stick, string and a magnet.  All the fishes have paperclips on them so the kids can go fishing.  The kids love this as well.  I print mine off of the Primary Partners CD I have.

As I finish the other lessons I will post the links here:


For lesson 15 click here
Cover and Labels click here

I Am Thankful for Trees, Plants, and Flowers (Primary Manual 1, Lesson 10)


Sunbeam Lesson 10:
I Am Thankful for Trees, Plants, and Flowers

Another Lesson about the creation means another page for the creation book.  This page I actually started during the lesson, but I took couple weeks to finish it (the tree took a couple weeks to do in order to wait for the paint to dry):

First paint their fingers and the top of their palm green.  Place it at the bottom of the paper for the grass and stems.  Use their finger to make the flower.  I did the yellow centers first and then the petals.  The picture above has four petals, but it looks better with five petals.  Use the side of their palm and pinky finger and brown paint for the tree.  It will probably take two times ~ one stacked on top of each other.  I put more paint on the side of palm and pinky or just pinky to add branches.  After the branches dried they used their fingertips to add leaves.  They did this part a different week as I was helping another child paint the new page.  When that dried (the next week) we added apples with their finger tips.  Again, the child did that as I worked on the new project.  These would be much easier with two people, but I did them myself.

This one didn't get apples added to it.  You can see the branches better and it has five petals on the flowers.

We also planted flowers in paper cups.  I cut out a piece of paper that is shaped to wrap around the cup.  I let the kids decorate this and then I tape it on. I was going to do two cups, one with flowers and one with tomatoes, but do to time shortage we just did flowers.  I had the dirt in the cup already.  I gave them a few seeds to sprinkle around top and then we added a little more dirt.  We didn't water them in class so it wouldn't be so messy to transport home, but we talked about giving them water and sunlight.  We also sampled a bunch of fruits and veggies.

As I finish the other lessons I will post the links here:
For lesson 15 click here
Cover and Labels click here