I love to do crafts and have cute handouts and activities for church (and school, and friends, and - well you get the idea). I don't consider myself creative, but often use the help of others' talents. I decided to share what I'm doing for others just like me. It may be a link to where I found something or it might even be something *I* created. Right now I work as a paraprofessional at my kids' elementary - in special ed (autism). I started creating items for my 3rd graders this year and can't wait to share them with you. I am the 1st counselor in YW (first time in YW is this past year). I also have ideas for cub scouts and sunbeams posted, my previous callings.
Pages
Saturday, July 6, 2013
I Am Thankful for Birds and Insects (Primary Manual 1, Lesson 13)
Sunbeam Lesson 13: I Am Thankful for Birds and Insects
This is another fun lesson I have done in the past. First I make binoculars. You can do this with two empty toilet paper rolls or two rolled up pieces of cardstock. Glue them together and punch a hole in each side. Tie some string or yarn through the holes so that they can hang from their neck. I also print bug jars and insects from my Primary Partners CD. I did find one similar on Sugar Doodle (but the insects are different): http://c586449.r49.cf2.rackcdn.com/bugjar.pdf. I cut out the jar and staple a Ziploc bag to it. I color around each insect with marker. Same insect = same color (all the bees are yellow, the crickets green, etc.). I put painters tape rolled on the back covered with a piece of wax paper. The wax paper removes easily and it is much faster to hang them with tape on them. Before class I hang the bugs and insects around the classroom. The kids come in and sit in their seats. I give them their binoculars and then we start the lesson (after prayer of course).
I bring in a lot of Eric Carle Books: The Very Hungry Catepillar, The Very Quiet Crickets, The Very Busy Spider, The Bad Tempered Lady Bug. Plus I use the activities in the book for the bee, spider, and butterfly.
First we talk about birds at the beginning of the lesson. Then we move to the insects. I read a story (for example The Very Quiet Cricket) and then I tell them to use their binoculars and go find a cricket to put in their jar. I also tell them what color the cricket is. There is a story or activity for each insect. The kids love it!
Our page for our creation book:
It is hard to see but the top of this page is blue and the bottom is green. I used their finger to make lady bugs, bees, a butterfly and a caterpillar. When it is dry add details with a sharpie. If you need more of an explanation of how they were made leave me a comment. If you click on the picture it should enlarge for you. Here are some more examples:
As I finish the other lessons I will post the links here:
I Am Thankful for Animals (Primary Manual 1, Lesson 12)
Sunbeam Lesson 12: I Am Thankful for Animals
I downloaded an app for the ipad called I Hear Ewe. It is a free app makes different animal sounds. The kids loved guessing which animal made the sound. I was able to play the sounds and start helping the kids on the next page of the book.
The page of the book looks like this:
To make the giraffe paint the whole hand yellow. Place it on the paper upside down. This makes the four legs and the tail. Opposite of the tail you will make the neck. Do this by painting the side of their palm (and pinky finger if you want) yellow. You will need to use their finger to make the head. Let them make dots with brown. You may have to do this next week after the yellow paint has dried. When it is dry use a brown marker for details and add a small googly eye.
As I finish the other lessons I will post the links here:
I Am Thankful for Fish (Primary Manual 1, Lesson 11)
Sunbeam Lesson 11: I Am Thankful for Fish.
This is actually one of my favorite lessons. From back when I started teaching sunbeams at the age of 18 (yes, I demanded to be put into primary right out of high school so I could avoid going to relief society) I started this. I must admit after being a mother I thought twice about it, but still did it because it is just so much fun and more importantly ~ the kids LOVE it!
What is all the excitement about? Fish of course. I give each child a fish to take home. If I had more money (or a super small class) I would give them a beta fish, but since I don't, I give them a feeder fish. You can buy them at any pet store that has fish or even Walmart. Don't forget to pick up a jar of goldfish food. I divvy it out into snack sized Ziploc bags. This year I purchased some jars at Dollar Tree that look like fish bowls (I believe they are listed as candy bowls). I put one fish in each of the bowls. Be sure to buy extra fish because a few of them may not make it over night. Also be prepared to talk the next week about death (this year the next week was Easter so it was perfect). Most likely all but one will have died by then. I have used jars in the past. Just remember that they need air so you can't put a lid on them.
We also made a page for our creation book. Actually, we ran out of time and I did it a different week, but this is the page that goes with the lesson:
I also give the kids a fish bowl with a plastic bag stapled to it and fishes cut out of paper. They have a fishing pole made out of a Popsicle stick, string and a magnet. All the fishes have paperclips on them so the kids can go fishing. The kids love this as well. I print mine off of the Primary Partners CD I have.
As I finish the other lessons I will post the links here:
I Am Thankful for Trees, Plants, and Flowers (Primary Manual 1, Lesson 10)
Sunbeam Lesson 10:
I Am Thankful for Trees, Plants, and Flowers
Another Lesson about the creation means another page for the creation book. This page I actually started during the lesson, but I took couple weeks to finish it (the tree took a couple weeks to do in order to wait for the paint to dry):
First paint their fingers and the top of their palm green. Place it at the bottom of the paper for the grass and stems. Use their finger to make the flower. I did the yellow centers first and then the petals. The picture above has four petals, but it looks better with five petals. Use the side of their palm and pinky finger and brown paint for the tree. It will probably take two times ~ one stacked on top of each other. I put more paint on the side of palm and pinky or just pinky to add branches. After the branches dried they used their fingertips to add leaves. They did this part a different week as I was helping another child paint the new page. When that dried (the next week) we added apples with their finger tips. Again, the child did that as I worked on the new project. These would be much easier with two people, but I did them myself.
| This one didn't get apples added to it. You can see the branches better and it has five petals on the flowers. |
As I finish the other lessons I will post the links here:
Tuesday, April 30, 2013
Over 15 Teacher Appreciation Ideas and Printables
If you have read my blog before you know that I believe teacher are underpaid and under thanked. Through the last few years I have tried to come up with some thank yous for our teachers. Most of my ideas are fairly inexpensive. I want to thank all my children's teachers, including their specialists. Now that I have two in middle school that is at least 21 teachers. It does add up, but I believe they deserve a little thanks too. Actually I haven't been good about thanking the middle school extras (like the librarian) and I often forget their counselors and the nurse. I do what I can.
Here are some things (and links) to things I have done in the past and each item has a free printable you can download. Please become a follower before you download.
I like to give one gift every day. Here is some things I did last year:
This is one of my favorites, and I'm thinking I may do it again. You can attach it to a box of brownies or a plate of brownies, but I'm thinking about attaching it to a mug of mix that you put in the microwave (just have to find it on pinterest again). Then it is a serving for one and they get a cute mug!
This is one of my most pinned, most popular posts.
This is an easy, expensive and cute gift. Easy to do for lots of teachers, specialists, and staff. You can also dress it up with a flower pot and garden gloves. You can even go a step closer with a trowel and other gardening supplies.
Word Play on "mint" coming soon {I guess I forgot to post it last year}.
This is tied in with a bulletin board idea and a box of recipes the kids wrote about their teacher.
A Poem explaining the colors of M&M's and a bulletin board idea.
Or
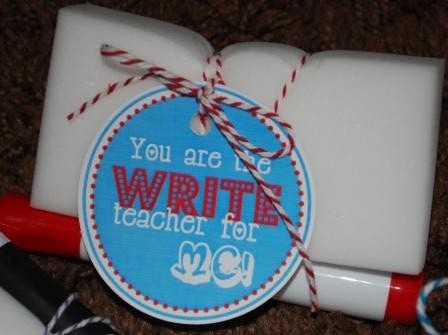
Attach to pens, pencils, chalk, expo markers, etc.
Can be made for as a birthday present or for as a teacher appreciation gift.
Attach the bag to a pair of sunglasses.
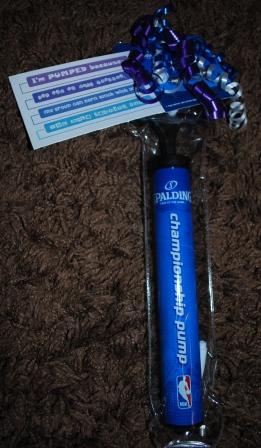
Or try one of my monthly gifts I did last year (I didn't quite make it each month).
I've hit a home run being in your class
Your a hit above the rest
You have hit every situation we have pitched right out of the park
I'm glad to pitch-in for some fun
If you used these for teacher appreciation instead of a small gift you could attach it to baseball tickets or merchandise.
No Picture - Attach to football item.
I hope that you can find an idea or two that will be able to use. Please remember that if you choose to download, please
become a follower first (on the right). I'm happy to share my
creations with my followers. If you would like to leave a comment too
that would totally make my day!
Linking to parties listed above on the Link Party tab including:
Sunday, April 14, 2013
Happy Day
Today is a Happy Day. I just reached 100 followers, and I was featured on Somewhat Simple, not once but twice. I also have had over 228,000 hits. I truly wish I had more time to dedicate to this blog, but one day I will get everything I want up here. Thanks for sticking around with me. I will continue to share as much with you as I can.
Go check out Somewhat Simple and see my feature and those of others. I was featured in her Water Activities for kids and Playroom storage. I'm working on finishing up the Lego Party and then I hope to finish more storage ideas with you. Don't forget to check out all my Teacher Appreciation ideas since Teacher appreciation week will be here soon.
Sunday, March 24, 2013
Lego Birthday Party - Games - Part 2
The party was a hit and the kids had a great time! I had plenty of games, in fact we didn't have time for one of them and there are a couple I wanted to do that I left out completely. As the party goers arrived they went into the kitchen to decorate a Lego Figure Head. It was just the head on yellow paper. I did have this picture up on the computer to give them some face ideas. These would be used later in the game of pin the head on the Lego Man. After they did that they made a guess of how many Lego's were in this jar:
I had slips of paper with their name on it (in Lego font of course) so they just needed to write their estimation on it. This jar and an empty jar to place their slips in were on the party table. After most everyone arrived we played the hit of the party, especially among the boys!
It is similar to Pictionary and they do sell it as a Lego game called Creationary. I spent some time on YouTube checking it out. First of all I wasn't going to invest more into this party (the game isn't cheap) and second, the reviews weren't great. They said the idea behind the game was good, but there weren't enough bricks. So I decided to create the game myself. First we sorted our Lego bricks by color. I used a party tray (veggie tray) to store them in. Next I made the cards. I made 9 cards in five different themes. We had animals, nature, vehicles, buildings, and food. I printed the pictures off on white paper and then I printed number cards on colored paper with each number having its own color. I cut all the cards out and glued a picture to a number card keeping all the same theme with the same number/color of paper. For example all of the nature themed cards were on green paper with the number 5 on the back. I then laminated the cards for durability.
When it came time to play I was able to let the kids know what numbers/colors went with what theme. Nature is green 5, vehicles are purple 3, buildings are blue 6, etc. We divided into two teams. Each team rolled one die. The number on the die was the card they picked. So if they rolled a 5 they picked the card with a five. Their team could guess as many times as they could in two minutes. After two minutes the builder had to stop building and each person on their team got one guess. If they guessed correctly they received a point. If they didn't the other team could guess it correctly and steal the point. The cards were numbered 1, 3, 4, 5, 6. I left out 2. If they rolled a 2 they got a chance for double the points and the other team got to pick the category. Amazingly enough 2 was the only number that wasn't rolled. The boys REALLY loved this game and wanted to keep playing it. We let each person go once and that was all we had time for. If you want to use the cards I made, you can download them at the bottom of this post.
I didn't give the winners anything special. Instead after each child played each game they were able to go pick a Lego Crayon Man:
Sorry this isn't the best picture. I went a little crazy in the crayon prep and made a whole bunch of these cute men. We laid them out in rows of color and wrote their color at the bottom of the row. After each game was completed they picked out a new crayon. So far two games were played - guesstemation (being a little creative with the words - estimate/guess) and the creationary game.
Next we played pin the head on the Lego man with the heads they created:
Using a projector at work I traced a Lego Figure onto a large piece of paper. I brought it home to create our Lego Man. First I took wrapping paper in red and blue. Using spray adhesive I adhered the paper wrong sides together so it became double sided. I cut out the pants out of blue, shirt out of red, and the hands and head out of yellow paper. I drew on some details. We gave the front of our Lego Man a face, but left the back blank. I hung him on the glass door and taped some balloons in his hand (it turned out to be a VERY windy day so the balloons ended up getting taped in several places). When the party goers came to the door our Lego Man was there to great them. When it came time for the game you could still see him on the inside minus a face. If you look at the collage above you can see some of their artistic abilities.
We announced the winners of the guessing game and then had cake, ice cream, and presents. Then it was back to more games.
For this game you had to use a straw and move all your Lego pieces off of your plate and onto the floor using only your sucking power. You could also spread out Lego pieces on a table, set a timer and see how many pieces you could put on your plate using a straw and sucking in a set amount of time. The birthday girl liked the first idea so that is what we did:
To make it more fun I took yellow square plates and drew Lego faces on them. We also added the top part of the head by cutting it out of construction paper and gluing it on. I used polka dotted straws and hot glued a Lego head to it. I forgot to take pictures, but they are the same heads I used for the juice straws. We put equal bricks on the plates, same size and amount on each plate. They formed a circle with their backs to the center. On go they moved those bricks off their plate as fast as the could. After the game they could keep their plate and straw if they wanted.
The next game was memory. I had a friend save baby food jars. I painted them like I have seen on various blogs. I used spray paint, but it has been cold, wet, and windy here. Unfortunately I don't have a garage so I tried to cheat and many of them didn't turn out well. So I switched tactics (wish I thought of this first) - I put some yellow paint inside the jars, swirled it around and then dumped out the extra. They were nice and smooth and pretty. To make the faces I wrote on the jars with a sharpie. The jars that had paint inside were actually easier to write on.
On the bottom of the jars I put pictures of Lego pieces. I had two of each picture. The kids played just like memory. Inside of the jars I had Lego Mini Figures. I was going to use them for the next game, but we ran out of time.
The last game ended up being fun. We played it on Date Night. (To see how we do Date Night see this post).
This was an idea floating around Pinterest, but it was just a picture, no game. I wanted to play the game so I created it. You need one die, a mini figure (one per player), a board, and Lego bricks. Above the kids used a 2x4 Lego block but a 2x2 or 2x3 would fit a little better. I made a couple options. I chose to print the first link (it used less ink) and trim it down. I then glued it to colored card stock and laminated. To play you roll the die and follow the instructions. They always have one base block and can never lose that one. They loved the game and played it several times.
If you choose to download, please become a follower first (on the right). I'm happy to share my creations with my followers. If you would like to leave a comment too that would totally make my day!
I had slips of paper with their name on it (in Lego font of course) so they just needed to write their estimation on it. This jar and an empty jar to place their slips in were on the party table. After most everyone arrived we played the hit of the party, especially among the boys!
It is similar to Pictionary and they do sell it as a Lego game called Creationary. I spent some time on YouTube checking it out. First of all I wasn't going to invest more into this party (the game isn't cheap) and second, the reviews weren't great. They said the idea behind the game was good, but there weren't enough bricks. So I decided to create the game myself. First we sorted our Lego bricks by color. I used a party tray (veggie tray) to store them in. Next I made the cards. I made 9 cards in five different themes. We had animals, nature, vehicles, buildings, and food. I printed the pictures off on white paper and then I printed number cards on colored paper with each number having its own color. I cut all the cards out and glued a picture to a number card keeping all the same theme with the same number/color of paper. For example all of the nature themed cards were on green paper with the number 5 on the back. I then laminated the cards for durability.
![]() |
| These are the building cards. |
I didn't give the winners anything special. Instead after each child played each game they were able to go pick a Lego Crayon Man:
Sorry this isn't the best picture. I went a little crazy in the crayon prep and made a whole bunch of these cute men. We laid them out in rows of color and wrote their color at the bottom of the row. After each game was completed they picked out a new crayon. So far two games were played - guesstemation (being a little creative with the words - estimate/guess) and the creationary game.
Next we played pin the head on the Lego man with the heads they created:
Using a projector at work I traced a Lego Figure onto a large piece of paper. I brought it home to create our Lego Man. First I took wrapping paper in red and blue. Using spray adhesive I adhered the paper wrong sides together so it became double sided. I cut out the pants out of blue, shirt out of red, and the hands and head out of yellow paper. I drew on some details. We gave the front of our Lego Man a face, but left the back blank. I hung him on the glass door and taped some balloons in his hand (it turned out to be a VERY windy day so the balloons ended up getting taped in several places). When the party goers came to the door our Lego Man was there to great them. When it came time for the game you could still see him on the inside minus a face. If you look at the collage above you can see some of their artistic abilities.
We announced the winners of the guessing game and then had cake, ice cream, and presents. Then it was back to more games.
For this game you had to use a straw and move all your Lego pieces off of your plate and onto the floor using only your sucking power. You could also spread out Lego pieces on a table, set a timer and see how many pieces you could put on your plate using a straw and sucking in a set amount of time. The birthday girl liked the first idea so that is what we did:
To make it more fun I took yellow square plates and drew Lego faces on them. We also added the top part of the head by cutting it out of construction paper and gluing it on. I used polka dotted straws and hot glued a Lego head to it. I forgot to take pictures, but they are the same heads I used for the juice straws. We put equal bricks on the plates, same size and amount on each plate. They formed a circle with their backs to the center. On go they moved those bricks off their plate as fast as the could. After the game they could keep their plate and straw if they wanted.
The next game was memory. I had a friend save baby food jars. I painted them like I have seen on various blogs. I used spray paint, but it has been cold, wet, and windy here. Unfortunately I don't have a garage so I tried to cheat and many of them didn't turn out well. So I switched tactics (wish I thought of this first) - I put some yellow paint inside the jars, swirled it around and then dumped out the extra. They were nice and smooth and pretty. To make the faces I wrote on the jars with a sharpie. The jars that had paint inside were actually easier to write on.
On the bottom of the jars I put pictures of Lego pieces. I had two of each picture. The kids played just like memory. Inside of the jars I had Lego Mini Figures. I was going to use them for the next game, but we ran out of time.
The last game ended up being fun. We played it on Date Night. (To see how we do Date Night see this post).
This was an idea floating around Pinterest, but it was just a picture, no game. I wanted to play the game so I created it. You need one die, a mini figure (one per player), a board, and Lego bricks. Above the kids used a 2x4 Lego block but a 2x2 or 2x3 would fit a little better. I made a couple options. I chose to print the first link (it used less ink) and trim it down. I then glued it to colored card stock and laminated. To play you roll the die and follow the instructions. They always have one base block and can never lose that one. They loved the game and played it several times.
If you choose to download, please become a follower first (on the right). I'm happy to share my creations with my followers. If you would like to leave a comment too that would totally make my day!
Subscribe to:
Posts (Atom)